Abstract
Based on customer’s semi-autogenous mill working conditions, Qiming Machinery researches corrosion-abrasion resistant alloy steels for semi-autogenous mill liners.
Semi-autogenous mill liners are under impact abrasive and serious corrosive wear conditions. Nowadays high-manganese steel has been widely used as the SAG mill liner plates domestic and abroad, but the short life of high-manganese steel liner plates under abrasion made the production cost increase and this material must be displaced. In order to improve the service life and reduce the production cost of SAG mill liner plates, the development of new wear-resistant alloy steels has academic significance and economic value. In this context, a new type of high carbon low alloy steel has been developed and researched, at the same time a new bainite steel liner plates, a new high manganese steel composite liner plates, and a pearlite steel liner plates have been developed in Qiming Machinery. The effect of the heat treatment process on the chemical composition, microstructure, hardness, impact toughness, tensile test, corrosion resistance, and impact corrosion abrasive wear resistance of the high carbon low alloy steel was researched with Leica metallographic microscope, muffle furnace, hardness tester, instrumented impact tester, tensile test machine, impact corrosion、abrasion testing machine, X-ray diffusion,scanning electron microscopy, and other research instruments and means. At the same time, the microstructure and comprehensive properties of three new abrasion-resistant liner plates were explored.
Firstly, four different heat treatments were made for high carbon low alloy wear-resistant steel with the composition of C 0.65%, Si 0.54%, Mn 0.97%, Cr 2.89%, Mo 0.35%, Ni 0.75%, N 0.10%. The effect of heat treatment processes on high carbon low alloy’s microstructure and properties was discussed. The results show that the microstructure of high carbon low alloy steel annealed with being 1000°C annealed, 950°C normalized, and 250°C tempered is pearlite, and its Charpy V-notch impact absorption energy is highest (8.37 J). The elongation with the same heat treatment processes is maximum (14.31%), while the tensile strength, yield strength, and hardness are 1005 MPa, 850 MPa, and 43.8 HRC. High carbon low alloy steel with being 1000°C annealed, 950°C normalized, and 250°C tempered has the best comprehensive properties.
The results of the study of the three new types of liner plates developed are as follows. The hardness of the bainite steel liner plates is 51.7 HRC. After working hardening, the liner plates’hardness increases by 50HV, and its Charpy V-notch impact absorption energy is 7.50 J, whose hardness and toughness match well. High manganese steel matrix composite liner plates are a composite material with austenite as matrix and carbide as the second phase. The hardness of high manganese steel matrix composite liner plates is 26.5 HRC. After working hardening, the liner plates’ hardness increases to 667 HV(58.7 HRC), and its Charpy U-notch impact absorption energy is 87.70J. Elongation of the liner plates with good toughness is 9.20%, while the tensile strength and yield strengths are 743 MPa and 547 MPa. The hardness of pearlitic liner plates is 31.3 HRC. After working hardening, the liner plates’ hardness is almost unchanged, and its Charpy V-notch impact absorption energy is 6.00J. Elongation of the pearlitic liner plates is low (6.64%), while the tensile strength and yield strengths are 766 MPa and 420 MPa.
In 4.5 J impact energy conditions: the worn loss weight of bainite steel liner plates is least, and this material have the best performance of impact corrosion abrasive wear resistance in this condition. In 9J impact energy conditions: the worn loss weight of high carbon low alloy steel annealed with being 1000°C annealed, 950°C normalized and 250°C tempered is least, and this material has the best performance of impact corrosion abrasive wear resistance in this condition.
Analyses of the demand for apply conditions, when the impact load is very small, the SAG liner plates should be made by the bainite steel. when the impact load is large, the SAG liner plates should be made by the high carbon low alloy steel annealed with being 1000°C annealed, 950°C normalized, and 250°C tempered.
1.1 Research status of semi-automatic mill liner materials
1.1.1 Semi-automatic Mill
In 1932, the progress of industrial technology gave birth to the first autogenous mill in the world. Around 1950, the autogenous mill was formally used in mine production. After 1960, the full autogenous grinding process became popular in many metallurgical mines in many countries. In the self grinding process, ore with a size greater than 100 mm is used as the main grinding medium in grinding, but the size is between 20 mm and 80 mm
Because of its poor grinding ability, it is not easy to be grinded to the appropriate size by the large size ore. In order to solve this problem, researchers try to add a certain amount of steel ball into an autogenous mill to grind this kind of abrasives. Generally, the amount of steel ball added is 2 ~ 8% of the volume of the autogenous mill. This improvement greatly improves the efficiency of the grinding section of the mine, and the semi-autogenous mill should also be produced.
Figure 1-1 shows the solid diagram of the semi-autogenous mill used in metal mines, and Figure 1-2 shows the lining plate of the semi-autogenous mill to be assembled. In short, the semi-autogenous mill is a kind of metal mine production equipment that uses a grinding ball partly and ore itself to grind metal ore. Although the semi-autogenous mill is relatively high in energy consumption, which is not conducive to the effective utilization of energy, the semi-autogenous mill includes: medium and fine crushing operation, screening operation, and ore transfer, which greatly shortens the mine production process, reduces dust pollution, reduces the production cost and reduces production investment.
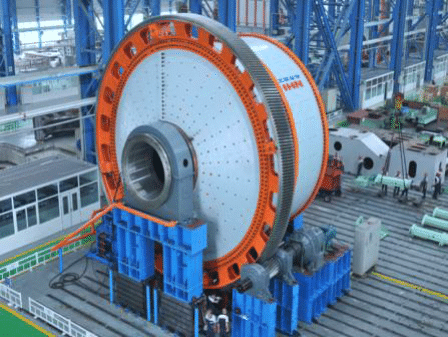
Fig.1-1 Semi-autogenous mill
The semi-autogenous mill mainly includes the transmission part, main bearing, cylinder screen, cylinder part, slow drive device, main motor, jacking device, lubrication, electric control, etc. the mill liner is the core component of the barrel part of the semi-autogenous mill and is also the part with the most loss.
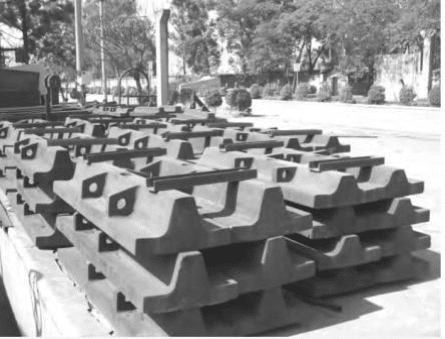
Fig.1-2 Semi-autogenous mill liners
1.1.2 Semi-autogenous mill liners
The cylinder of the semi-autogenous mill rotates synchronously under the drive of the motor. The materials (steel ball and metal ore) loaded in the cylinder rotate to a certain height with the cylinder. Under the action of gravity, they are thrown down at a certain linear speed. The metal ore, grinding ball, and lining plate will have a relatively large impact and serious wear. These effects make the metal ore be grinded, and the most important is to grind the metal ore After grinding, the qualified material is sent out of the cylinder under the impact of water.
1.2 Wear-resistant materials for semi-autogenous mill liners
The wear-resistant steel parts consumed by abrasive wear is one of the most severe working conditions of wear-resistant steel parts. Compared with dry abrasive wear conditions, wet abrasive wear conditions contain certain corrosion factors, so the wear degree is more complex and severe. The mill liners of the semi-autogenous mill are not only subjected to severe impact and wear for a long time but also subjected to the corrosion of wet mineral materials. At the same time, it has been subjected to the interaction of liner impact, abrasive wear, and electrochemical corrosion for a long time in the process of service, which makes the liner become the most severe wear and failure-prone part of the SAG mill.
It has a long history to use high manganese steel as mill liners of a wet mill at home and abroad. Up to now, high manganese steel is still the most widely used material for wet mill liner. Other wear-resistant and corrosion-resistant alloy steels, such as pearlite steel liner, are also used at home and abroad, but the effect is not very satisfactory. It is an urgent need for the wet mill liner industry and an important task for technical innovation to develop a new type of high carbon low alloy steel liner with good abrasion resistance and put into application.
1.2.1 Austenitic manganese steel
In cast wear-resistant steel, austenitic manganese steel has been widely used in various wear-resistant steel parts due to its unique properties and has a long history. The metallographic structure is mainly single-phase austenite, or the austenite contains a small amount of carbide. The austenite structure has a strong work hardening ability. When the working surface is subjected to a large impact force or large contact stress, the surface layer will work hardening rapidly, and its surface hardness can even be increased to 700 HBW, so the wear resistance is enhanced. Although the hardness of the surface layer of the working face increases, the hardness, and toughness of the austenite structure in the inner layer remain unchanged, which makes the high manganese steel not only have excellent wear resistance but also have the ability to resist large impact load. Because of this characteristic, high manganese steel has an excellent application effect in impact abrasive wear and high stress grinding abrasive wear conditions. There are many advantages of high manganese steel, but there are also many defects. When the impact force or contact stress of high manganese steel is too small, the steel can not get enough work hardening, and the wear resistance is reduced, so it can not work normally. In addition, it is found that the corrosion resistance of high manganese steel is poor, which can not achieve the ideal effect in a wet environment。
Since the 1960s, researchers at home and abroad have begun to reform austenitic steel in order to improve its comprehensive properties. Most of them add some alloy elements, such as Cr, Mo, Ni, V, etc., and adjust the content of C and Mn at the same time, and adopt inoculation modification to obtain better wear resistance austenitic manganese steel. Up to now, the research and Exploration of alloying, modification, and strengthening of austenitic steels and metastable austenitic steels have achieved gratifying results. Some countries even add improved austenitic steels to national standards. High manganese steel is a common material for wet mill liners at home and abroad. When the impact load of the wet mill is too small, the work hardening of high manganese steel is not complete, and its impact abrasive wear resistance will be weak. Moreover, due to the poor corrosion resistance of austenite structure, the corrosion resistance life of austenitic steel is relatively low.
1.2.2 Wear-resistant cast iron
Low alloy and high alloy white cast iron are widely used at present. Compared with the traditional white cast iron and low carbon white cast iron, the new wear-resistant cast iron represented by low chromium and high chromium white cast iron has better wear resistance.
Chromium is the main alloying element of low chromium white cast iron. The carbides in general low chromium white cast iron are dispersed in the cast iron by the network. Therefore, the brittleness of low chromium white cast iron is larger, and the wear resistance is lower than that of medium and high alloy white cast iron. Generally, it is not suitable for working conditions with high wear resistance and toughness requirements. High chromium white cast iron is widely used in many types of equipment and working conditions, which is due to the wide range of chromium content (10% ~ 30%) of high chromium white cast iron. The toughness of low-carbon Cr12 cast iron in high chromium white cast iron is enhanced due to the adjustment of chromium content, which can meet the requirements of a large cement ball mill with a large impact load; after certain heat treatment, Cr15 cast iron can obtain good performance mixed with a small amount of carbide and The martensitic structure of retained austenite has good wear resistance, which can be used for grinding ball and lining plate materials of ball mill in cement plant; Cr20 and Cr26 cast iron have a good matching of hardness and toughness and high hardenability, which can be used in thick wall wear-resistant parts. In addition, Cr20 and Cr26 cast iron have strong corrosion resistance and oxidation resistance, which can also be used in wet corrosion wear and high-temperature wear conditions.
1.2.3 Non-manganese wear-resistant alloy steel
With the development of more and more non-manganese alloy steels with excellent performance, it is found that the hardness and toughness of this kind of alloy steel can be adjusted in a large range by optimizing the composition ratio or exploring heat treatment, and it can also have high hardness and high toughness at the same time. It has a good application effect in many working conditions. Non-manganese alloy steel can have high hardness, high strength, and good toughness at the same time. Its strength and hardness are much higher than that of austenitic manganese steel, and its application effect is better under the condition of small impact load. Chromium, manganese, nickel, silicon, molybdenum, and other alloy elements are often added into wear-resistant steel to improve its mechanical properties and hardenability.
1.2.3.1 Medium-high alloy wear-resistant steel
In recent years, Qiming Machinery’s engineers have done a lot of research on medium and high alloy martensitic wear-resistant steel (C 0.2 ~ 0.25%, Cr 3 ~ 16%, Ni ≤ 2%, Mo ≤ 1%) lining plate, and some progress has been made.
(1) Chemical composition design
Carbon element
The carbon content has a direct effect on the microstructure, mechanical properties, hardenability, and other properties of alloy steel. The results show that the hardness of the sample decreases with the decrease of carbon content, which leads to the lack of wear resistance, but the toughness is relatively better; with the increase of carbon content, the hardness of the sample increases, the wear resistance is relatively better, but the plasticity and toughness become worse. The results show that the hardness of alloy steel increases with the increase of carbon content, and its plastic toughness decreases. When the carbon content is in a certain range (0.2 ~ 0.25%), the impact toughness (α K) of alloy steel decreases very slowly and almost remains unchanged. Within this range of carbon content, the microstructure of alloy steel is lath martensite The results show that the composite mechanical properties of the three kinds of structures are good, and the impact corrosion abrasive wear resistance is excellent.
Chromium element
Chromium element can improve the hardenability of alloy steel to a certain extent. The steel has good comprehensive mechanical properties after the proper heat-treatment process. Chromium elements can exist in the form of chromium-containing carbide in carburized steel, which can further improve the wear resistance of steel parts to a certain extent. Our engineers have studied the effect of Cr on the properties of Cr Ni Mo-alloy steels with a C content of 0.15-0.30. The results show that the impact toughness of alloy steel can be improved by increasing the content of chromium under the condition of quenching and tempering. Therefore, in the design of alloy steel, we can adjust the content of chromium element to make alloy steel obtain better comprehensive mechanical properties, so as to achieve the best wear-resistant effect.
Our engineers have studied the wear resistance of alloy steel with different chromium elements under acidic conditions. It is found that with the increase of chromium content (1.5% ~ 18%), the wear resistance of steel parts first increases and then decreases. When the chromium content is 12.5%, the steel has the best wear resistance and corrosion resistance. Finally, the mass fraction of alloy element chromium is It is concluded that 10 ~ 12% of the wear-resistant alloy steel has the best wear-resistant effect.
Nickel element
At the same time, nickel can improve the hardenability of alloy steel to optimize its mechanical properties. The results show that the hardness of alloy steel is improved little by adding nickel element, but the impact absorption energy and toughness of alloy steel can be improved to a great extent. At the same time, nickel can accelerate the passivation of Fe Cr alloy steel and optimize the corrosion and oxidation resistance of Fe Cr alloy steel. However, the content of nickel in wear-resistant alloy steel should not be too high (generally less than 2%). Generally, too high content of nickel will make the γ phase zone too large, which will lead to the increase of retained austenite phase in the alloy steel, which makes the alloy steel unable to obtain good comprehensive properties.
Molybdenum element
Molybdenum can refine the grain size of alloy steel to a certain extent, so as to optimize the comprehensive properties of alloy steel. Molybdenum can improve the hardenability of martensitic steel and improve the strength, hardness, and corrosion resistance of martensitic steel at the same time. The content of silicon in steel parts is usually less than 1%.
Silicon element
The content of silicon can affect the austenite transformation of alloy steel. The addition of silicon makes the diffusion of carbon atoms slow in the process of quenching, hinders the formation of carbides in alloy steel, resulting in high carbon concentration. The stability of the austenite phase is improved during the phase transformation. At the same time, a certain amount of Si can improve the hardness and wear resistance of alloy steel through solution strengthening. Generally speaking, the content of silicon in steel is about 0.3% ~ 0.6%.
(2) Heat treatment process and metallographic structure
The heat treatment process directly affects the microstructure and mechanical properties of steel parts. Our engineers found that the heat treatment process has an effect on a low alloy wear-resistant steel (chemical composition is C 0.3%, Mn 0.3%, Cr 1.6%, Ni 0.4%, Mo 0.4%, Si 0.30%, Re 0.4%). The heat treatment is quenching (850 ℃, 880 ℃, 910 ℃, and 930 ℃) and tempering (200 ℃ and 250 ℃). The results show that when the tempering temperature is constant, the hardness of the sample increases with the increase of quenching temperature, while the impact absorbed energy decreases and the toughness becomes worse. More carbides precipitate in the alloy steel tempered at 250 ℃, which increases the hardness of the matrix. The mechanical properties of the sample tempered at 250 ℃ are better than those tempered at 200 ℃. The wear resistance of the low alloy steel tempered at 890 ℃ and tempered at 250 ℃ is the best.
Our engineers also studied the heat treatment of medium carbon low alloy steel with a chemical composition of C 0.51%, Si 0.13%, Cr 1.52%, and Mn 2.4%. The effects of water cooling, air cooling and air cooling on the microstructure of the alloy steel were studied respectively The microstructure of quenched alloy steel is martensite, and the microstructure after air cooling and air cooling is both martensite and bainite After further tempering at 200 ℃, 250 ℃, 300 ℃, 350 ℃ and 400 ℃, the overall hardness of the samples shows a downward trend. Among them, the air-cooled and air-cooled samples are multiphase structures containing the bainite phase, and their hardness decreases more slowly. The wear loss increases with the increase of tempering temperature. Because the bainite texture has good resistance to tempering softening and good toughness, the hardness of air-cooled and air-cooled samples decreases The wear resistance of the composite structure with the bainite phase is better.
(3) Study on mining mill liners materials
Our engineers analyzed the failure behavior of the lining plate (5cr2nimo alloy steel) of the semi-autogenous mill in the vanadium titanium magnetite mine. The results show that the microstructure of the alloy steel is martensite with retained austenite. During the service of the lining plate, the mineral aggregate has an impact abrasive wear effect on the lining plate, and the lining plate is also corroded by the pulp. A large number of corrosion pits and cracks were observed on the worn surface of the lining plate in service. It is considered that the failure reason of the lining plate is that the impact load under the working condition is too low, and the lining plate is not sufficiently hardened, resulting in the low hardness of the working surface of the lining plate and poor wear resistance.
Our engineers also studied the impact corrosion abrasive wear resistance of three kinds of low carbon high alloy steels with different carbon contents (C: 0.16%, 0.21%, 0.25%). The results show that the hardness of the alloy steel increases with the increase of carbon content, while the impact absorption energy decreases. The experimental results show that the alloy steel with 0.21% carbon content has the smallest wear loss and the best impact corrosion abrasive wear resistance.
The effect of silicon content (Si: 0.53, 0.97, 1.49, 2.10, 2.60, c0.25%) on the microstructure, mechanical properties and wear resistance of medium carbon high chromium alloy cast steel were also studied. The results show that the alloy steel with a silicon content of 1.49% has the highest hardness (55.5 HRC) and the best toughness (impact absorption energy: 27.20 J), and its microstructure is lath martensite. The impact corrosion abrasive wear test (impact load: 4.5 J) shows that the alloy steel with a silicon content of 1.49% has the least wear loss and the best impact corrosion wear resistance.
Our engineers also studied the impact corrosion abrasive wear of three kinds of mine wet grinding liner steel. The three kinds of liners are low carbon high alloy steel (lath martensite structure, hardness: 45 ~ 50 HRC, impact toughness value greater than 50 J / cm2), high manganese steel (single-phase austenite structure, hardness > 21 HRC, impact toughness value greater than 147 J / cm2) and medium carbon alloy steel (tempered martensite structure containing a small amount of bainite and retained austenite, hardness: 57 ~ 62 HRC, impact toughness value: 20 ~ 30 J/cm2)。 The impact load is 2.7J and the ore material is acid iron ore. The test results show that the low carbon high alloy steel liner has the least abrasion weight loss and the best impact corrosion wear resistance.
1.2.3.2 Low alloy wear-resistant steel
The advantages of low alloy steel are mainly manifested in its good hardenability, high hardness, and high toughness. More and more researchers begin to study the possibility of using low alloy steel instead of high manganese steel as mill liners of the wet mill. Generally, the low alloy steel is transformed into tempered martensite with good comprehensive properties by adding elements such as C, Mn, Cr, Si, Mo, B, and selecting appropriate heat treatment.
Our engineers have studied the application of zg40cr2simnmov steel in the mill liners. The heat treatment process is 900 ℃ annealing + 890 ℃ oil quenching + (220 ± 10 ℃) tempering. After the above heat treatment, the microstructure of zg40cr2simnmov steel is single-phase tempered martensite, and its comprehensive mechanical properties are good: hardness ≥ 50 HRC, yield strength ≥ 1200 MPa, impact toughness ≥ 18 J/cm2. The alloy steel and high manganese steel (mechanical properties: hardness ≤ 229hb, yield strength ≥ 735mpa, impact toughness ≥ 147j / cm2) have been tested in several mines such as the alumina plant of Shandong Aluminum Corporation. The test results show that the zg40cr2simnmov steel lining plate has a long service life in a wet ball mill and dry ball mill.
Our engineers have also studied the study of a low alloy wear-resistant cast steel and the use of lining plates. Different heat treatment processes were explored for the low alloy steel, and the optimum process was quenching at 900 ~ 950 ℃ and tempering at 500 ~ 550 ℃. After the heat treatment, the alloy steel had the best mechanical properties, hardness: 46.2 HRC, yield strength: 1500 MPa, impact toughness: 55 J / cm2.
The results of impact abrasive wear show that the wear resistance of the low alloy steel quenched at 900 ~ 950 ℃ and tempered at 500 ~ 550 ℃ is better than ZGMn13 under the same test conditions. In addition, the alloy steel and ZGMn13 were tested in the Sizhou concentrator of the Dexing copper mine. The results show that the service life of the multi-element low alloy steel liner is 1.3 times as long as that of the ordinary ZGMn13 lining plate.
Under the condition of wet grinding in metal mines, the limitations of the traditional high manganese steel liner, which is widely used at present, are increasingly prominent, and it is the general trend that its dominant position will be replaced. The low-alloy martensitic wear-resistant steel developed at present has good wear resistance, but its toughness is poor, which results in its impact resistance unable to meet the working conditions of metal mine lining plate. A similar situation exists in other alloy steel, which hinders the renewal of mine mill liner. It is still a difficult task to develop new wear-resistant alloy steel which can replace the traditional high manganese steel mill liners.
1.2.3.3 Bainite wear-resistant steel
The overall mechanical properties of bainitic steel are good, and the lower bainite steel has high hardness, high toughness, low notch sensitivity, and cracks sensitivity. The traditional production method of bainitic steel is adding Mo, Ni, and other precious metals and adopting an isothermal quenching process. This not only makes the production cost of bainitic steel too high but also easily leads to the instability of steel quality due to the difficulty of process control. The industrial application of bainitic steel is also seriously limited. With the further exploration and exploration of bainitic steel, bainite dual-phase steel has been developed, such as Austenite Bainite Dual-phase steel, eutectic reinforced Austenite Bainite Steel, martensite bainite dual-phase steel, etc. because of its low production cost, bainite steel can be used in the industry.
Austenite Bainite (A / b) dual-phase steel combines the strong work hardening ability of austenite and the high hardness and toughness of bainite, so a / b dual-phase steel has high strength and good toughness, and has excellent wear resistance. Mn Si Austenite Bainite Dual-phase steel obtained by austempering has good wear resistance, which can meet many wear-resistant conditions. In this kind of dual-phase steel, Mn, Cr, and other elements with a lower cost are selected to improve the hardenability of steel parts. The production cost is further reduced and a new type of Mn Si Austenite Bainite dual-phase steel with good comprehensive properties is obtained. A kind of bainitic steel with micro and nanostructure with retained austenite dispersed in the bainite matrix is introduced. The New Bainitic Steel has both ultra-high-strength and plasticity and shows excellent mechanical properties. The results show that the micro bainitic steel with high retained austenite has a high hardness value at relatively low tempering temperature (less than 500 ℃), which shows good tempering stability.
Although bainitic steel has excellent mechanical properties, its production process is complex and its cost is too high, which limits its application in the mine wet grinding lining plate industry. The industrial application of bainite series wear-resistant steel in metal mines needs further exploration.
1.2.3.4 Pearlite wear-resistant steel
Pearlitic steel is usually obtained by normalizing and tempering after alloying with chromium, manganese, molybdenum, and other elements in carbon steel. Pearlitic steel has good toughness, impact fatigue resistance, simple heat treatment, and no valuable alloy elements. Its production cost is low. It is a kind of wear-resistant and corrosion-resistant alloy steel with great development potential. High carbon Cr Mn Mo wear-resistant alloy steel has good toughness and certain work hardening ability, so it can be used in corrosive abrasive wear environment with certain impact load.
The chemical composition and mechanical properties of representative high carbon Cr Mn Mo pearlite wear-resistant steel are shown in Table 1-1.
| Table 1-1 Chemical composition and mechanical properties of pearlite wear-resistant cast steel | |||||||
| Chemical composition | mechanical properties | ||||||
| C | Mn | Si | Ni | Cr | Mo | HBW | KV2/J |
| 0.55 | 0.6 | 0.3 | 0 | 2 | 0.3 | 275 | / |
| 0.65 | 0.9 | 0.7 | 0.2 | 2.5 | 0.4 | 325 | 9.0-13.0 |
| 0.65 | 0.9 | 0.3 | 0 | 2 | 0.3 | 321 | / |
| 0.75 | 0.9 | 0.7 | 0.2 | 2.5 | 0.4 | 363 | 8.0-12.0 |
| 0.75 | 0.6 | 0.3 | 0 | 2 | 0.3 | 350 | / |
| 0.85 | 0.9 | 0.7 | 0.2 | 2.5 | 0.4 | 400 | 6.0-10.0 |
1.3 Wear mechanism and model
Wear refers to the phenomenon that the material is separated from the contact surface due to certain stress due to the relative sliding of the material. The mechanism of material detachment from the surface may be different due to the different properties of materials, working environment, load, and action mode. The wear mechanism can be divided into adhesive wear, abrasive wear, surface fatigue wear, fretting wear, and impact wear. According to statistics, the economic loss caused by abrasive wear is the largest, accounting for about 50% of the total, adhesive wear accounts for 15% of the total; fretting wear accounts for 7%; erosion wear accounts for 7% of the total; corrosion wear accounts for 5% of the total.
1.3.1 Abrasive wear mechanism
The wear of alloy steel caused by abrasive wear is the largest, which mainly results from 1. The wear caused by the sliding of hard and rough surface on the soft surface; 2. The wear caused by the mutual friction of hard particles sliding between the contact surfaces. According to the different wear conditions, the abrasive wear mechanism can be divided into the following two types:
Type 1:Micro cutting mechanism
Under the action of external load, the wear particles on the surface of the material produce a force on the material. When the direction of the force is in the normal direction, the wear particles on the surface of the material produce a force on the material, When the direction of the force is tangential, the abrasive particles move parallel to the wear surface due to the tangential force. If the resistance of the abrasive particles moving on the material surface is small, it will cut the material and produce chips. The cutting path of abrasive particles on the material surface is narrow and shallow, and the cutting size is small, so it is called micro-cutting. If the abrasive particles have no sharp edges or the angles are different from the cutting path direction, or the material itself has good plasticity, the cutting effect will not make the material produce chips, but will be pushed to the front or both sides by the abrasive particles, and a furrow will be formed on the material surface along the abrasive particle motion path.
Type 2:Mechanism of fatigue spalling
Fatigue spalling mechanism refers to that the matrix is deformed and hardened under the action of abrasive particles, and cracks are generated on the subsurface layer due to contact stress. The cracks extend to the surface and fall off in the form of a thin layer, and irregular spalling pits are formed on the surface of the material. When the abrasive particles slide on the surface of the sample, a large plastic deformation area will be formed. After repeated plastic deformation, due to work hardening, the surface of the material finally peels off into wear debris. In general, the fatigue limit based on the wear resistance of the material is incorrect.
1.3.2 Mechanism and model of corrosion and wear
The wet mill used in metallurgical mines will not only suffer from the impact of heavy load and severe wear but also be corroded by liquid slurry. Corrosion wear refers to the process of mass loss caused by the electrochemical or chemical reaction between the material surface and the surrounding environment, which is called corrosion wear. The working condition of mine wet mill is usually electrochemical corrosion wear. The mutual promotion mechanism between wear and corrosion makes the loss of materials exceed the single wear rate plus the corrosion rate. In order to study the effect of wet abrasion on the mechanism of wear, it is necessary to study the mechanism of corrosion.
1.3.2.1 Promotion of wear on corrosion
(1)Mechanical removal model. Figure 1-3 shows the mechanical removal model. Due to the existence of a corrosive medium, uniform corrosion will occur on the metal surface during corrosion and wear, and the corrosion products generated can completely cover the surface of the sample. This layer of corrosion product is called corrosion film. It can prevent the material surface from further corrosion, but it is easy to be worn away by other hard materials or abrasive particles in the relative sliding of stress. Then the bare metal surface is easy to corrode, so wear promotes corrosion. In a specific corrosion medium, the corrosion resistance of materials mainly depends on the passive film. Generally, the corrosion wear rate of metal with poor recovery ability of passive film will increase by 2 orders of magnitude or even 4 orders of magnitude compared with the single static corrosion rate.
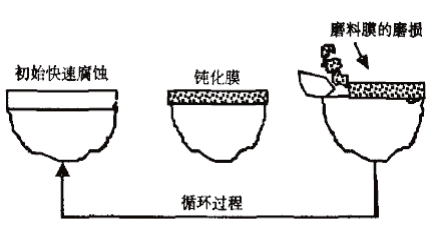
Fig.1-3 Model of mechanical removing of surface
(2) According to the electrochemical model, a certain plastic deformation area will be produced on the surface of the metal sample due to the angular shear force of the abrasive. The electrochemical corrosion of the metal surface is very uneven, which leads to a further increase in the corrosion rate.
1.4 The purpose, significance, and main contents of this research
The running cost of a semi-autogenous mill used in metal mine production is huge, and the most serious part of wear and expenditure is the mill liner. China consumes about 2.2 million tons of wear-resistant steel materials every year. Among them, the mill liner used in various production conditions consumes as much as 220000 tons of steel, which is about one-tenth of the total consumption of wear-resistant steel parts.
The working condition of the semi-autogenous mills used in metallurgical mine is bad. As the most seriously damaged part of the mill, the service life of the liner is too short, which not only increases the operation cost of the semi-autogenous mill but also seriously affects the production efficiency of the metal mine. At present, high manganese steel is usually used for the lining plate of the semi-autogenous mill. Although high manganese steel has good comprehensive performance and good work hardening ability, the yield strength of high manganese steel is too low, which is easy to deform and fail, which can not meet the service conditions of semi-autogenous mill liner, and the service life of lining plate is short. In order to improve the above problems, a new type of wear-resistant alloy steel with good comprehensive properties must be developed as a substitute for high manganese steel mill liners.
Based on the analysis of the industrial and mining environment of the semi-autogenous mill and the analysis of the lining materials of various wet mills, it is found that the liner of the semi-autogenous mill is of great significance The wear-resistant alloy steel for plate should have both hardness and toughness; the alloy steel should be single-phase structure as far as possible, or it should be the multi-phase structure with the good matching of hardness and toughness, such as matrix structure + carbide; the alloy steel should also match with good yield strength and have a certain ability to resist deformation; the alloy steel should have good impact corrosion abrasive wear resistance.
The main research contents are as follows:
(1)Study on heat treatment of wear-resistant high carbon low alloy steel.
Through the analysis of microstructure, mechanical properties, and impact corrosion abrasive wear of high carbon low alloy wear-resistant steel with different heat treatment, a kind of wear-resistant corrosion alloy steel with better comprehensive properties was obtained.
The composition of high carbon low alloy steel: C 0.65%, Si 0.54%, Mn 0.97%, Cr 2.89%, Mo 0.35%, Ni 0.75%, N 0.10%.
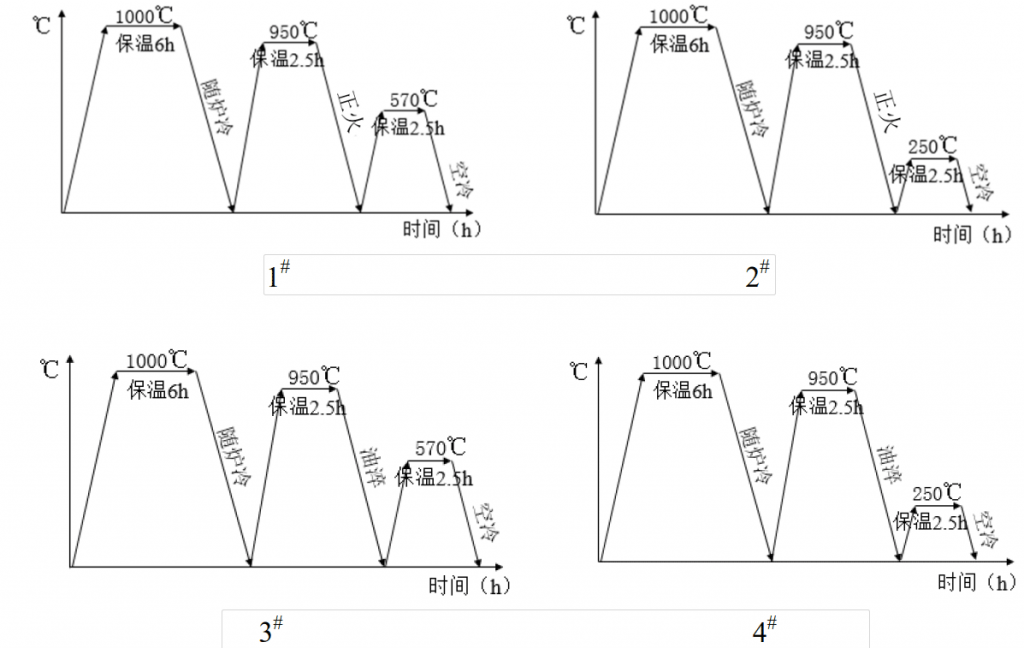
Heat treatment of high carbon low alloy steel: 1000 ℃× 6h annealing + 950 ℃× 2.5h oil quenching + 570 ℃× 2.5h tempering; 1000 ℃× 6h annealing + 950 ℃× 2.5h oil quenching + 250 ℃× 2.5h tempering; 1000 ℃× 6h annealing + 950 ℃× 2.5h normalizing + 570 ℃× 2.5h tempering; 1000 ℃× 6h annealing + 950 ℃× 2.5h normalizing + 250 ℃× 2.5h tempering.
(2)Based on the design of high carbon alloy steel, wear-resistant high carbon bainitic steel, high manganese steel matrix composite, and pearlite steel were designed respectively. The casting and heat treatment of the mill liners were completed in the Qiming Machinery and the preliminary trial was made in metal mines.
(3) Microstructure observation and research.
The metallographic structure of high carbon low alloy steel in heat treatment state was observed, and the influence of different heat treatment processes on the Microstructure of high carbon low alloy steel was analyzed through analysis and comparison. At the same time, the microstructure of wear-resistant bainitic steel, pearlite steel, and high manganese steel matrix composite liner is analyzed.
(4)Test and Research on mechanical properties.
The hardness and impact energy of as-cast and heat-treated high carbon low alloy steel were tested, and the hardness and impact toughness of high carbon low alloy steel after different heat treatment were studied. At the same time, the hardness and impact absorbed energy of wear-resistant bainitic steel, pearlite steel, and high manganese steel matrix composite liner were tested and analyzed. Tensile tests were carried out on as-cast and heat-treated high carbon low-alloy steels to study the yield strength and other properties of high-carbon low-alloy steels with different heat treatment processes. At the same time, the yield strength of wear-resistant bainitic steel, pearlitic steel, and high manganese steel matrix composite liner was tested and analyzed.
(5)Study on abrasive wear characteristics of impact corrosion
Under the impact energy of 4.5j and 9j respectively, the impact corrosion abrasive wear resistance and wear mechanism of high carbon low alloy steel with different heat treatment processes were studied, and the impact corrosion abrasive wear resistance of wear-resistant bainitic steel, pearlite steel, and high manganese steel matrix composite lining plates were tested and compared The analysis provides the basis for the practical industrial application of steel.
2.0 Test conditions and methods
In the condition of wet corrosive medium, the corrosion rate of steel material is much higher than that in dry condition, which is several times of dry state. In order to develop wear-resistant, corrosion-resistant, and impact-resistant wear-resistant alloy steel, high-carbon low-alloy wear-resistant steel, bainitic steel, pearlite steel, and high manganese steel matrix composites are designed in this paper, and the microstructure and mechanical properties of these alloy steels are also studied Tensile test, impact test, impact corrosion and abrasive wear tests were carried out to obtain wear-resistant steel with better comprehensive performance, which can provide a reference for the selection of semi-autogenous mill liners.
2.1 Test method
2.1.1 Test block casting
The high carbon and low alloy steel samples used in this paper were melted in alkaline furnace lining medium frequency induction furnace and cast into standard Y-shaped test block, which is shown in Fig. 2-1. The cast and heat treatment of wear-resistant high carbon bainitic steel, pearlite steel, and high manganese steel matrix composite mill liners have been completed in the Qiming Machinery, and preliminary trial use has been carried out in the mine.
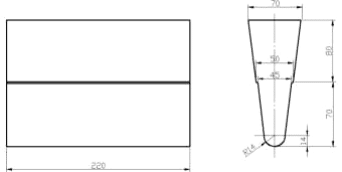
Fig.2-1 Schematic diagram of Y test-block sample of high carbon low alloy steel
2.1.2 Heat treatment process design
The heat treatment process has an obvious influence on the microstructure, mechanical properties, and wear resistance of high carbon low alloy steel. The heat treatment process of this kind of high carbon low alloy steel is shown in Fig. 2-2.
2.1.3 Sample preparation
The specimens for microstructure analysis, hardness, XRD, impact test, tensile test, and impact corrosion abrasive wear test were cut from Y-shaped test blocks of high carbon low-alloy steel with different heat treatment and as-cast states. The model of the wire cutting machine is DK77. Cut out the test block with grinding machine processing into the appropriate roughness.
2.1.4 Metallographic structure observation
The microstructure of each sample was observed by Lycra optical microscope. 4 vol.% nitric acid alcohol solution was used as a corrosion solution for high carbon low alloy steel, pearlite steel liner, and high manganese steel matrix composite lining plate in different heat treatment states. Due to the good corrosion resistance of bainitic steel, ferric chloride hydrochloric acid alcohol solution is selected as the corrosion solution of the bainite steel lining plate. The corrosion solution formula is 1g ferric chloride, 2ml hydrochloric acid, and 100ml ethanol.
2.1.5 Mechanical property test
Mechanical properties of materials, also known as mechanical properties of materials, refer to the mechanical properties of materials under various external loads in a certain environment. The conventional mechanical properties of metal materials include hardness, strength, impact toughness, and plasticity. This project focuses on macro hardness, impact tests, and tensile tests.
The Rockwell hardness (HRC) of high carbon low alloy steel, bainite steel liner, pearlite steel liner, and high manganese steel matrix composite lining plate as heat treated and as-cast were tested by HBRVU-187.5 Bromwell optical hardness tester. Each sample was measured at 10 different positions, and the hardness value of the sample was the arithmetic mean of the test results.
JBW-300hc instrumented metal pendulum impact testing machine was used to test the impact absorption energy of standard Charpy V-notch specimens of high carbon low alloy steel, pearlite steel liner, and bainite steel liner as heat treated and as-cast state respectively; high manganese steel matrix composite liner was processed into standard Charpy u-notch specimen according to the standard, and the impact absorption energy was tested. The impact size of each type of notched specimen is 10 mm*10 mm*50 mm, and the average impact size of each specimen is as shown in the drawing of 3 notches.
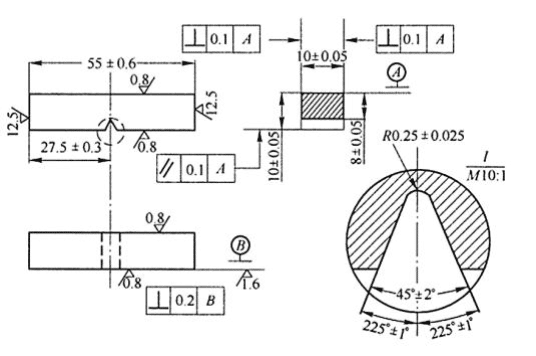
Fig.2-3 The size of the standard Charpy V-notched impact sample
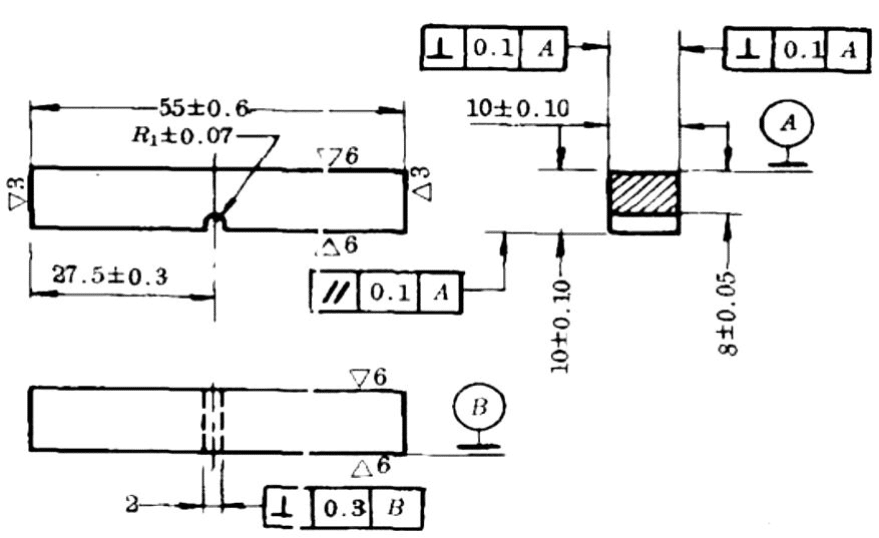
Fig.2-4 The size of the standard Charpy U-notched impact sample
By using WDW-300hc microcomputer controlled electronic universal tensile testing machine, tensile tests were carried out on high carbon low alloy steel, bainite steel liner, pearlite steel liner, and high manganese steel matrix composite lining plate as heat treated and as-cast at room temperature. High carbon low alloy steel, bainitic steel, pearlite steel, and high manganese steel matrix material lining plate samples as cast and heat-treated are processed into tensile test bars, as shown in Fig. 2-5. The room temperature tensile speed is set at 0.05mm/min, and each sample is tested three times, and the average value is taken.
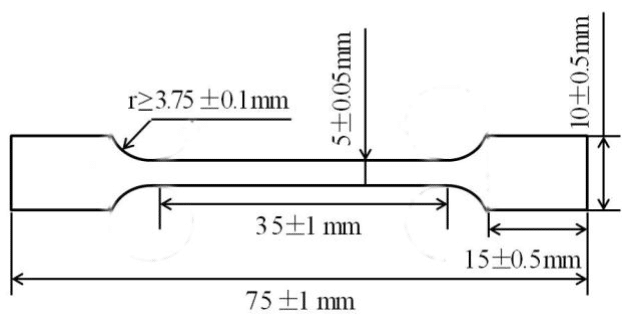
Fig.2-5 The sample size of the tensile test.
2.1.6 impact corrosion abrasive wear test
The impact corrosion abrasive wear test is carried out on the modified MLD-10a dynamic load abrasive wear testing machine. The schematic diagram of the wear tester is shown in Fig. 2-6. After modification, the test machine can simulate the impact corrosion abrasive wear condition of the semi-autogenous mill liner to a certain extent. The specific test parameters are shown in table 2-1.
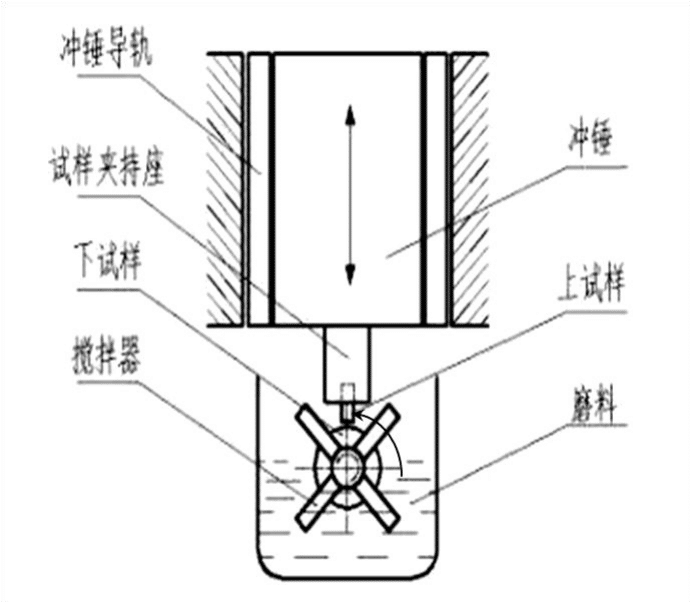
Fig.2-6 The schematic diagram of impact corrosion wear testing machine
| Table 2-1 The technical parameters of impact corrosion wear testing machine | |
| Parameter name | Parameter value |
| Impact energy / J | 4.5 |
| Hammer weight / kg | 10 |
| Impact times / time · min-1 | 100 |
| Free falling height of hammer / mm | 45 |
| Rotation speed of lower sample / R · min-1 | 100 |
| Abrasive size/mesh | 60-80 (Quartz sand) |
| Mass ratio of water to quartz sand | 2:5 |
| Water mass/kg | 1 |
| Quartz sand mass/kg | 2.5 |
During the test, the upper sample is installed on the hammer and the lower sample is set on the spindle. Driven by the motor, the lower sample, and mixing blade on the main shaft rotates with the motor. The impact hammer is raised to set the required height of impact energy and then falls freely. Driven by the hammer, the upper sample repeatedly impacts the lower sample and the abrasive (wet quartz sand) between the upper and lower samples by the mixing blade. In the time gap of preparing to enter the next impact erosion cycle, the upper and lower samples and abrasives will have relative sliding, and the process is three-body abrasive wear. Both the upper and lower samples are subjected to certain impact and abrasive wear, resulting in a weight loss of the sample, which is the amount of abrasion of the sample.
The lower samples of the samples are 45 steel after quenching and tempering, and the hardness is 50HRC. The upper samples are high carbon low alloy steel, bainite steel liner, pearlite steel liner, and high manganese steel matrix composite material lining plate as heat treated and as cast. Under the impact energy of 4.5j, the size of the upper sample is 10mm * 10mm * 30mm, and the lower end face is processed into an arc surface with a diameter of 50mm, as shown in Fig. 2-7; the upper part of the upper sample with 9j impact energy is 10mm * 10mm * 20mm, and the lower part is 7.07mm * 7.07mm * 10mm, and the lower end face is processed into an arc surface with a diameter of 50mm, as shown in Fig. 2-8.
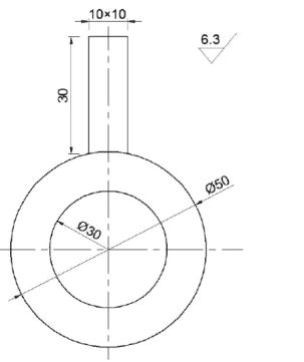
Fig.2-7 The schematic diagram of test-components under 4.J impact energy
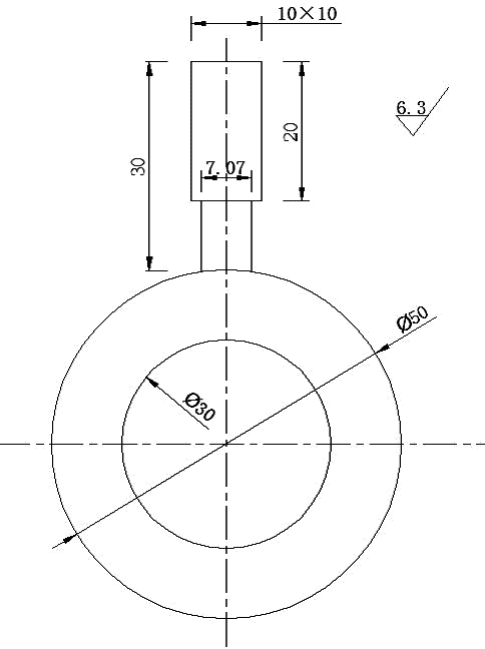
Fig.2-8 The schematic diagram of test-components under 9J impact energy
Before the wear test, the sample should be pre-ground for 30 minutes to eliminate the influence of the sample installation error and other factors. After pre-grinding, first remove the debris and other debris attached to the worn surface with a soft brush, then clean the sample with absolute ethanol ultrasonic, dry it immediately, and weigh it with electronic analytical balance (weigh it three times each time, and take its average value as the quality of the sample). At the beginning of the wear test, weigh every 15 minutes, and then repeat the above weighing operation.
2.1.7 Observation of impact fracture, tensile fracture, and corrosion wear morphology
The impact fracture, tensile fracture, and corrosion wear morphology of the samples were observed under 500 and 2000 times magnification by using phenom prox scanning electron microscope. The specimens to be observed were cleaned and dried with ethanol, and the surface morphology of the samples was observed under the scanning electron microscope, and the fracture mechanism and wear mechanism of wear-resistant alloy steel were analyzed.
3.0 Effect of heat treatment on Microstructure and mechanical properties of wear-resistant high carbon low alloy steel SAG mill liners
Heat treatment has a great influence on the microstructure and mechanical properties of high carbon low alloy steel. In this chapter, the effect of different heat treatment on the wear-resistant high carbon low alloy steel with a certain composition is studied, and the heat treatment process is optimized to obtain the optimal impact-resistant and wear-resistant alloy steel.
The chemical composition of wear-resistant high carbon low alloy steel is shown in table 3-1.
| Table 3-1 The chemical composition of abrasion-corrosion high carbon low alloy steels (wt.%) | |||||||
| C | Si | Mn | P | S | Cr | Ni | Mo |
| 0.655 | 0.542 | 0.976 | 0.025 | 0.023 | 2.89 | 0.75 | 0.352 |
According to the heat treatment process shown in Fig. 2-2, the Y-shaped test block was heat-treated and marked as samples 1, 2, 3, and 4, and the as-cast state was marked as sample 5. After heat treatment, the samples for microstructure observation, hardness test, impact test, tensile test, and impact corrosion abrasive wear test were cut by wire cutting machine.
3.1 Effect of heat treatment process on Microstructure and mechanical properties of high carbon low alloy steel
3.1.1 Microstructure
Figure 3-1 shows the microstructure of high carbon low alloy steel with different heat treatment states, and Figure 3-1 (a) (b) shows the metallographic structure of sample 1. After annealing at 1000 ℃ and normalizing at 950 ℃ and tempering at high temperature (570 ℃), the microstructure of the sample is pearlite. Fig. 3-1 (c) (d) shows the metallographic structure of sample 2. After annealing at 1000 ℃ and normalizing at 950 ℃ and tempering at low temperature (250 ℃), the microstructure of the sample is also pearlite. Fig. 3-2 (a) (b) shows the high-power microstructure taken by SEM. In the microstructure of sample 1 (Fig. 3-2 (a)), lamellar pearlite with alternating light and dark can be observed, and the microstructure of sample 2 (Fig. 3-2 (b)) can also be observed with obvious lamellar pearlite, Under the same magnification, the pearlite structure of high carbon low alloy steel (1 × 10) tempered at 570 ℃ tends to be spheroidized. Fig. 3-1 (E) (f) shows the metallographic structure of sample 3. After annealing at 1000 ℃, oil quenching at 950 ℃ and tempering at high temperature (570 ℃), the microstructure of the sample is tempered sorbite with martensite orientation. Fig. 3-1 (g) (H) shows the metallographic structure of sample 4. After annealing at 1000 ℃, oil quenching at 950 ℃ and tempering at low temperature (250 ℃), the microstructure of the sample is low-temperature tempered martensite. When the sample is quenched in oil at 950 ℃ and tempered at low temperature, C atoms diffuse first and precipitate dispersed carbides from supersaturated α solid solution. With the increase of tempering temperature, carbide precipitates in alloy steel increase, and carbide gradually transforms into cementite and grows up gradually. As time goes on, retained austenite begins to decompose and cementite precipitates at the same time. When the tempering temperature increases to 570 ℃, supersaturated C atoms completely precipitate from the supersaturated α solid solution, and the fine cementite aggregates and coarsens, showing the tempered sorbite which maintains the orientation of martensite.
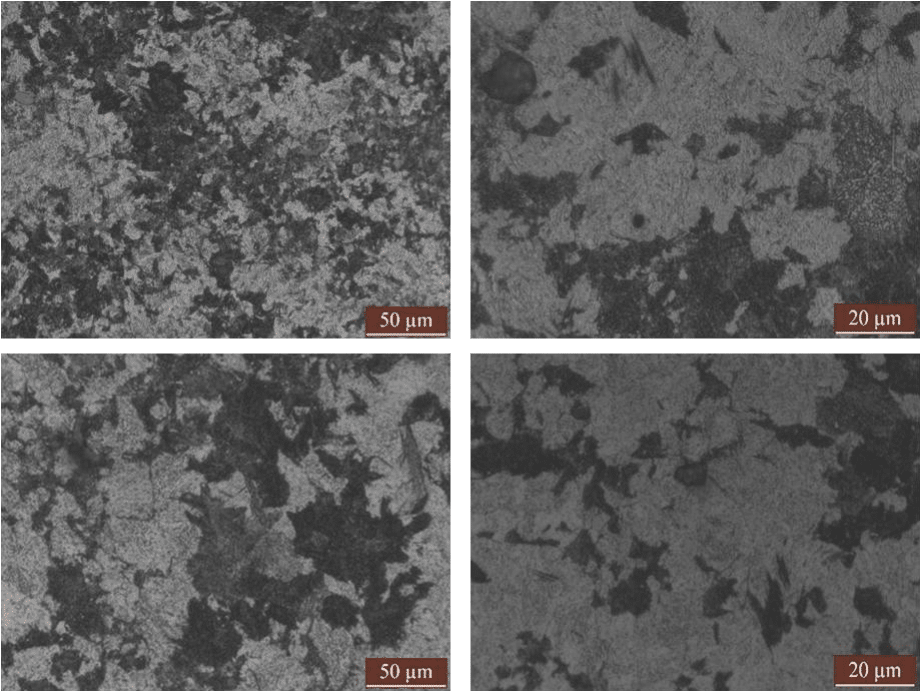
Fig.3-1 Microstructure of high carbon low alloy steels in different heat treatment process (a)(b)1#;(c)(d)2#
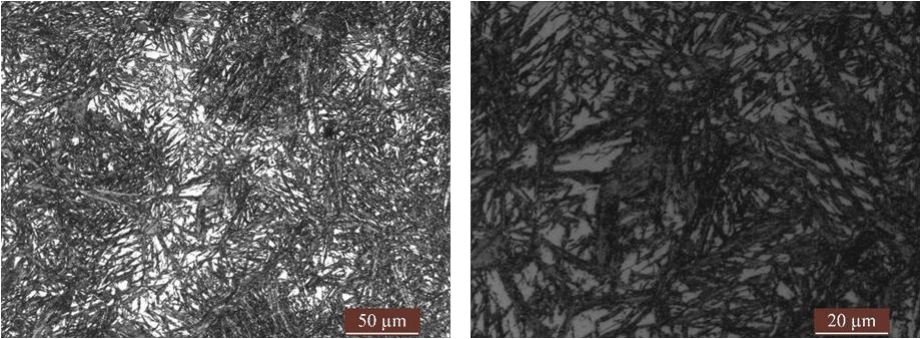
Fig.3-1 Microstructure of high carbon low alloy steels in the different heat treatment process (e)(f)3#
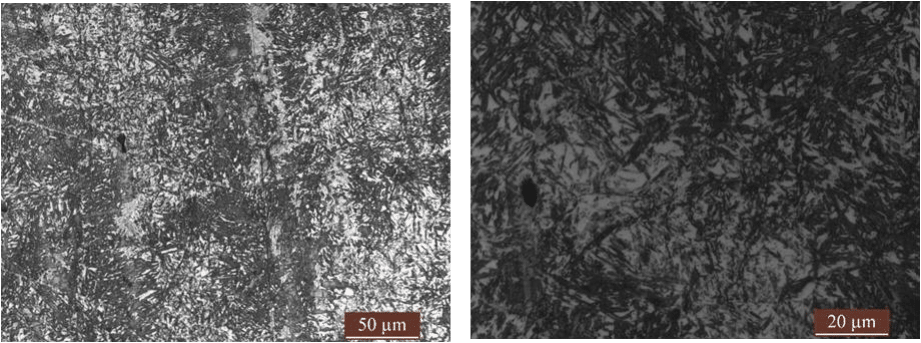
Fig.3-1 Microstructure of high carbon low alloy steels in the different heat treatment process (g)(h)4#
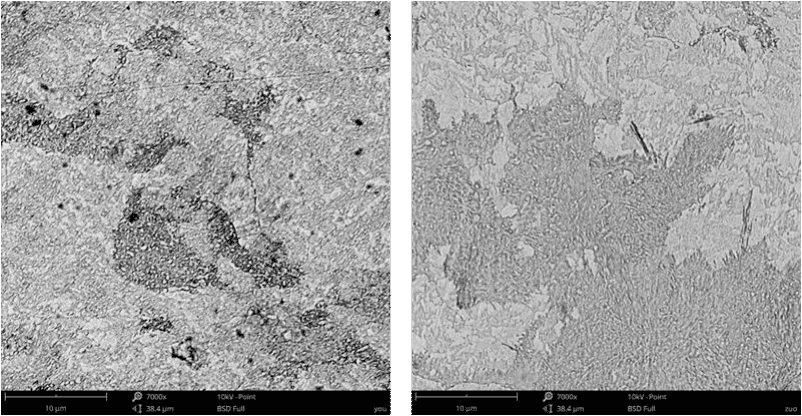
Fig. 3-2 Microstructure of high carbon low alloy steels after normalized and tempered (a)1#;(b)2#
Figure 3-3 shows the XRD diffraction patterns of high carbon low alloy steel in different heat treatment states. It can be seen from the pattern that the samples in different heat treatment states have only α phase or supersaturated α phase and cementite phase, without other phases.
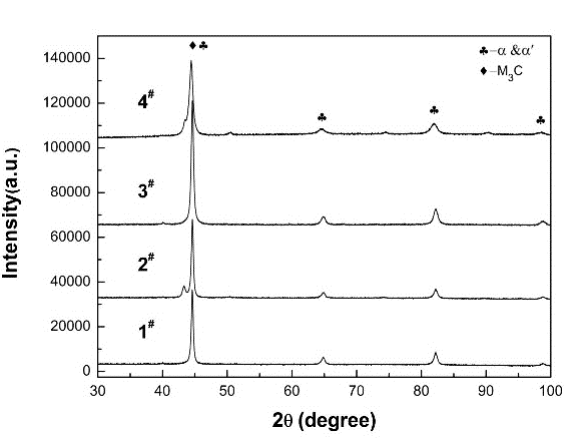
Fig. 3-3 XRD patterns of the high carbon low alloy steels after different heat treatment
3.1.2 Mechanical properties
Fig. 3-4 shows the hardness of high carbon low alloy steels in different heat treatment and as-cast states. The results show that: the hardness value of the high carbon low alloy steel (sample 4) annealed at 1000 ℃ and oil quenched at 950 ℃ and tempered at 250 ℃ is the highest. The hardness values of sample 1, sample 2, and sample 3 are very close and significantly lower than that of sample 4, and sample 2 is slightly higher than sample 1 and sample 3. Because the higher the tempering temperature is, the lower the hardness of alloy steel is. The hardness of 2 × 10 samples tempered at low temperature (250 ℃) is slightly higher than that of 1 × 10 samples tempered at high temperature (570 ℃), and that of 4 × 10 samples tempered at low temperature (250 ℃) is higher than that of 3 × 10 samples. 1# sample and 2# samples are high carbon low alloy steel after normalizing and tempering treatment. Tempering temperature has little effect on the hardness value of steel, and the difference is small, so the hardness value of the 1# sample and 2# sample has little difference. 3# sample and 4# sample are high carbon low alloy steel after quenching and tempering treatment. Tempering temperature has a great influence on the hardness value of the sample. The hardness of the 4# sample tempered at low temperature is much higher than that of the 3# sample after high-temperature tempering.
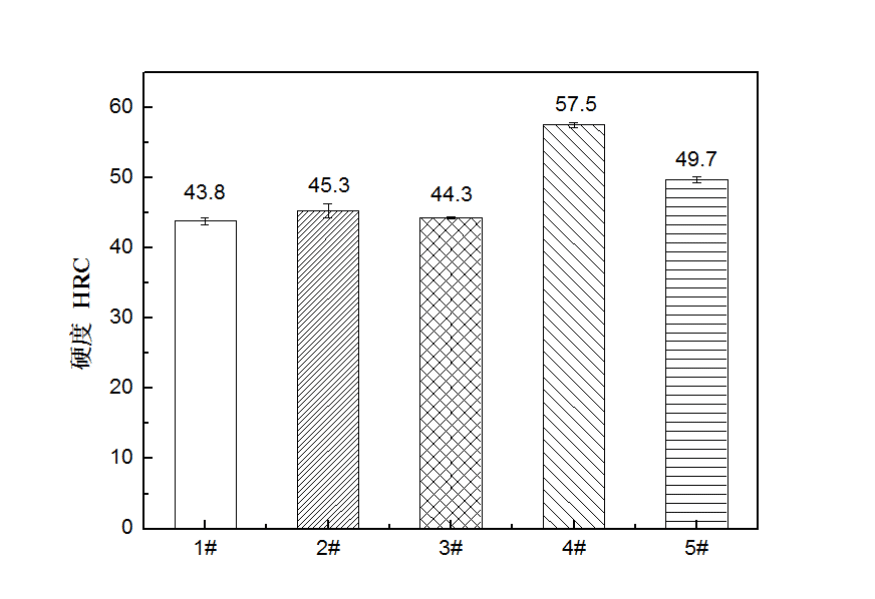
Fig.3-4 Hardness of high carbon low alloy steels in the different heat treatment process
The impact absorbed energy of different heat treatment and as-cast high carbon low alloy steels are shown in Fig. 3-5. The results show that the impact absorption energy of samples 1, 2, 3, and 4 decreases in turn. The impact absorption energy of high carbon low alloy steel (sample 1) annealed at 1000 ℃, normalized at 950 ℃, and tempered at 570 ℃ is significantly higher than that of other samples. This is because after normalizing treatment, the solid solution degree of each element in the alloy steel in austenite is enhanced, the segregation of alloy elements in the casting structure is improved, the homogenization degree of casting structure is improved, and the impact toughness of the steel is improved. After normalizing and tempering heat treatment, 1 and 2 samples are pearlite structure with good toughness. The pearlite structure of sample 1 is passivated and tends to spheroidize. Therefore, the toughness of sample 1 is better than that of sample 2, and the impact energy of sample 1 is higher. After oil quenching and low-temperature tempering treatment, the final microstructure of the alloy steel is tempered martensite. The sample maintains high hardness and low toughness as-quenched, so the alloy steel still maintains high hardness and low toughness. After oil quenching and tempering at high temperatures, martensite began to decompose and a large amount of sorbite was formed. The hardness of sample 3 decreased significantly and the toughness increased significantly. Therefore, the toughness of sample 3 was better than that of sample 4. The impact absorption energy of as-cast high carbon low alloy steel is the lowest and the toughness is the worst.
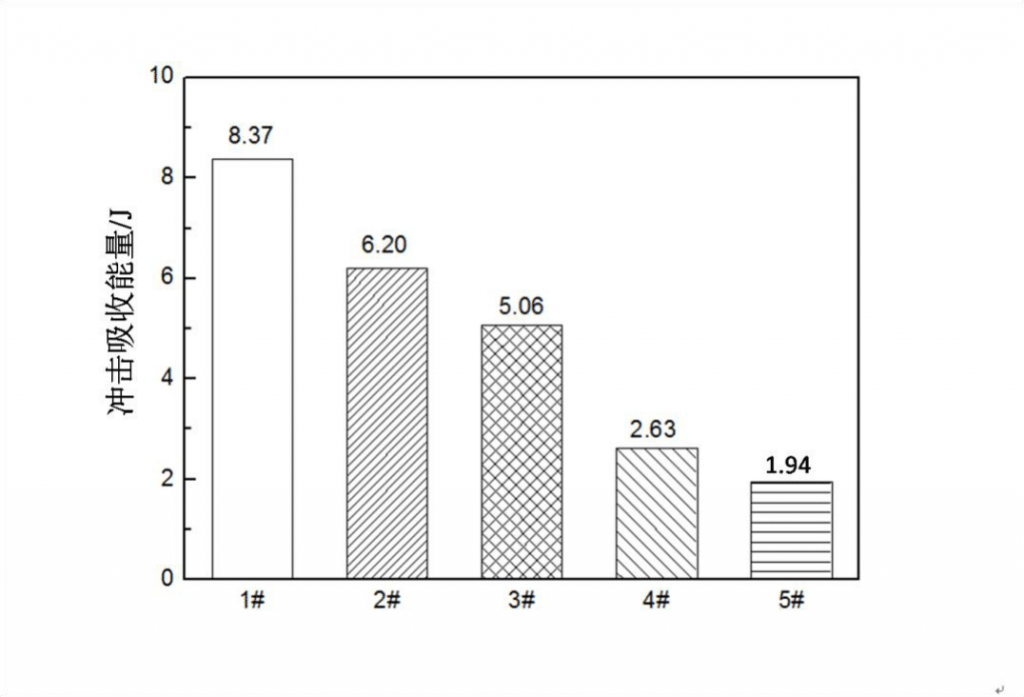
Fig.3-5 Impact toughness of high carbon low alloy steels in the different heat treatment process
The tensile results of high carbon low alloy steels in different heat treatment and as-cast states are shown in table 3-2, The results show that the tensile strength Rm: 3# >1#>2#>4#>5#; Yield strength Rel: 3#>1#>2#>4#、5#. In other words, the strength of high carbon low alloy steel (3 #) annealed at 1000 ℃, oil quenched at 950 ℃ and tempered at 570 ℃ has the highest strength, and the high carbon low alloy steel (4 #) annealed at 1000 ℃, oil quenched at 950 ℃ and tempered at 250 ℃ has the lowest strength. Elongation after fracture δ:1#>2#>3#>4#>5#, That is, the high carbon low alloy steel (1#) annealed at 1000 ℃, normalized at 950 ℃, and tempered at 570 ℃ has the best plasticity, 1#, 2#, 3#, and 4# are mixed fracture, The results show that the plasticity of high carbon low alloy steel (# 4) annealed at 1000 ℃, oil quenched at 950 ℃ and tempered at 250 ℃ is the worst, which is brittle fracture. The strength and plasticity of as-cast high carbon low alloy steel (# 5) are worse than those of the heat treatment sample, which is brittle fracture.
| Table 3-2 Tensile test results of high carbon low alloy steels in the different heat treatment process | |||
| Item No. | Tensile strength / Mpa | Elongation after fracture /% | Yield strength / Mpa |
| 1# | 1005 | 14.31 | 850 |
| 2# | 947 | 13.44 | 760 |
| 3# | 1269 | 10.53 | 1060 |
| 4# | 671 | 4.79 | / |
| 5# | 334 | 3.4 | / |
3.1.3 impact fracture analysis
Fig. 3-6 shows the impact fracture morphology of different heat treatment and as-cast high carbon low alloy steels. Fig. 3-6 (a) (b) shows the impact fracture morphology of high carbon low alloy steel (sample 1) annealed at 1000 ℃, normalized at 950 ℃, and tempered at 570 ℃. The SEM observation results show that the fracture surface is relatively flat according to the macroscopical observation (see Fig. 3-6 (a)) 3-6 (b)) observation shows that there are small dimples on the fracture surface, and a clear tongue pattern can be seen. This sample shows better toughness than other samples. Fig. 3-6 (c) (d) shows the impact fracture morphology of high carbon low alloy steel (sample 2) annealed at 1000 ℃, normalized at 950 ℃, and tempered at 250 ℃. It can be seen from the observation at low magnification (see Fig. 3-6 (c)) that the fracture surface is relatively flat, and from the high-power observation (see Fig. 3-6 (d)), a small number of dimples can be observed in the fracture, and obvious tongue like pattern and tear edge can be observed The characteristics of quasi cleavage are revealed. Fig. 3-6 (E) (f) shows the morphology of impact fracture of high carbon low alloy steel (sample 3) annealed at 1000 ℃, oil quenched at 950 ℃ and tempered at 570 ℃. The fracture is relatively flat according to the observation at low magnification (see Fig. 3-6 (E)), and there are a few dimples and a small number of tear edges in the fracture observed at high magnification (see Fig. 3-6 (f)). Fig. 3-6 (g) (H) shows the morphology of impact fracture of high carbon low alloy steel (4 #) annealed at 1000 ℃, normalized at 950 ℃ and tempered at 570 ℃. The fracture is an intergranular fracture observed at low magnification (see Fig. 3-6 (g)), and there are a few tearing edges and quasi cleavage fracture morphology at high magnification (see Fig. 3-6 (H)). Fig. 3-6 (I) (J) shows the morphology of impact fracture of as-cast high carbon low alloy steel (5#). The fracture shows a river pattern, which is a typical brittle fracture, and the toughness of the as-cast sample is the worst.
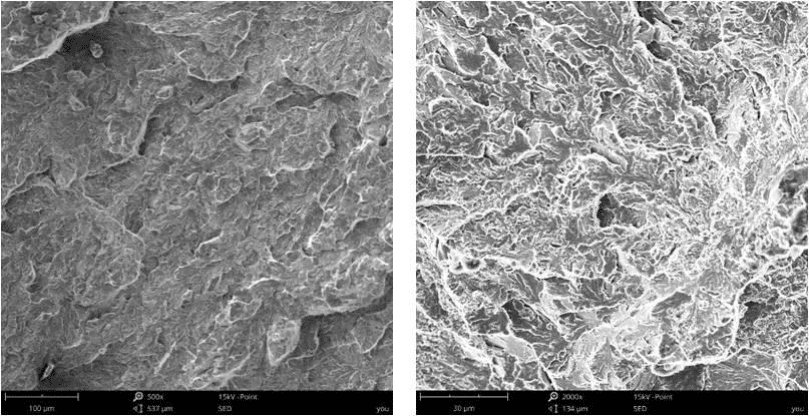
Fig.3-6 Fracture morphologies of high carbon low alloy steels in different heat treatment processes (a)(b)#1
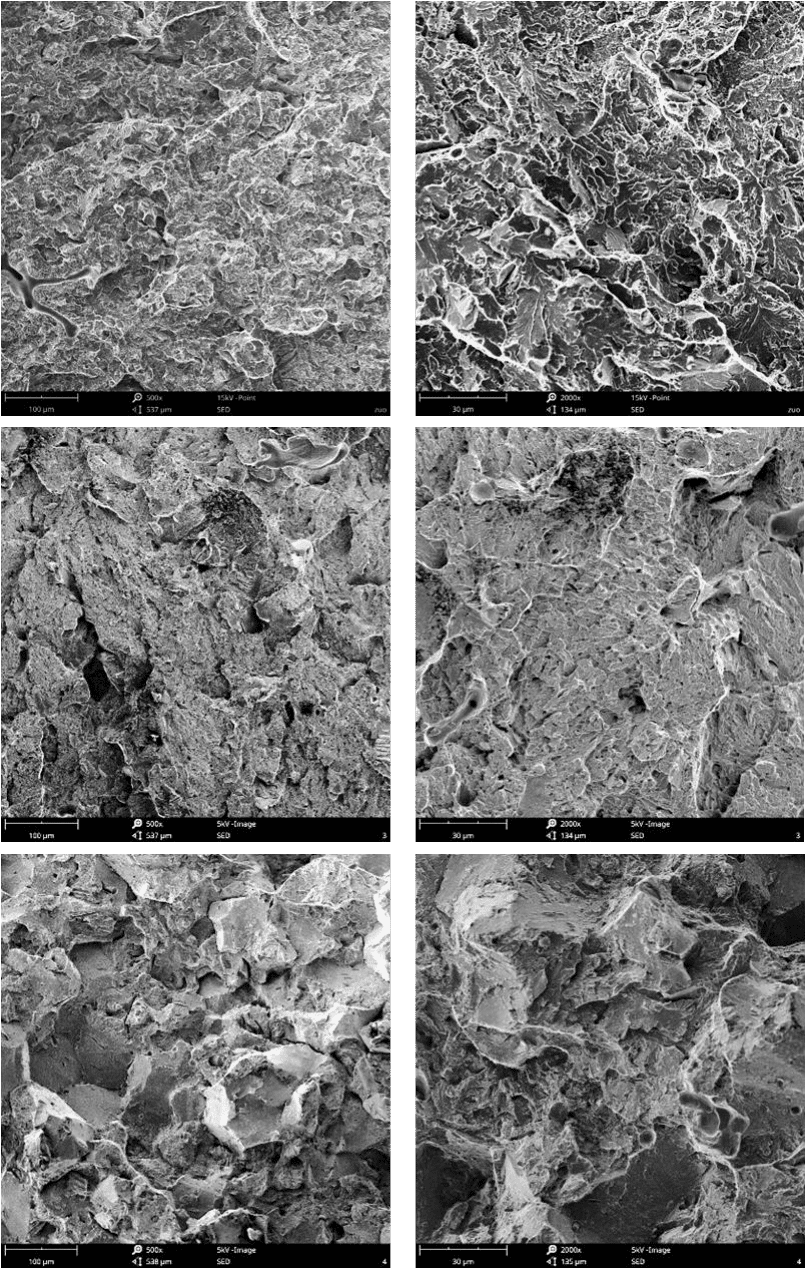
Fig.3-6 Fracture morphologies of high carbon low alloy steels in different heat treatment processes (c)(d)#2,(e)(f)#3,(g)(h)#4
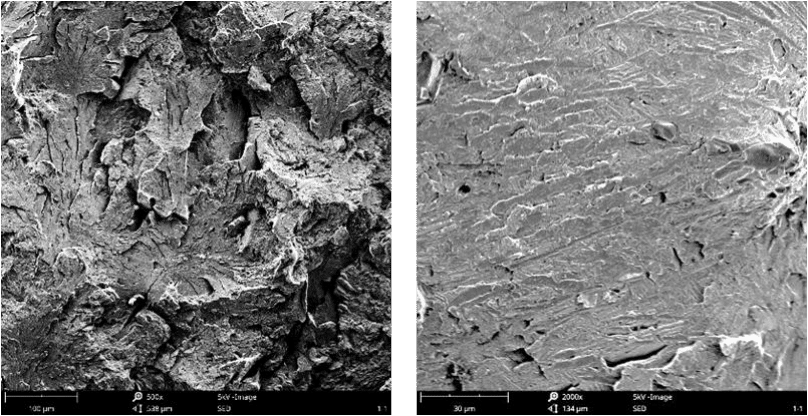
Fig.3-6 Fracture morphologies of high carbon low alloy steels in different heat treatment processes (i)(j)#5
3.1.4 Tensile fracture analysis
The tensile fracture morphology of high carbon low alloy steel with different heat treatment and as-cast state is shown in Fig. 3-7. Fig. 3-7 (a) (b) shows the tensile fracture morphology of high carbon low alloy steel (# 1) annealed at 1000 ℃, normalized at 950 ℃, and tempered at 570 ℃. Small dimples can be observed, and the fracture area is large, which belongs to ductile fracture with high toughness. Fig. 3-7 (c) (d) shows the tensile fracture morphology of high carbon low alloy steel (# 2) annealed at 1000 ℃, normalized at 950 ℃ and tempered at 250 ℃, Small dimples and partially smooth grooves are observed at high magnification (Fig. 3-7 (d)). No cracks are found in the grooves, which belongs to ductile fracture. The dimples are smaller and shallower, and the toughness of the sample is worse than that of the #1. Fig. 3-7 (E) (f) shows the tensile fracture morphology of high carbon low alloy steel (# 3) annealed at 1000 ℃, oil quenched at 950 ℃ and tempered at 570 ℃. Most cleavage patterns and a small number of tiny dimples can be observed. The cleavage pattern area is larger, the fiber area is smaller, and the #3 sample is a mixed fracture. Figure 3-7 (g)(h) The tensile fracture morphology of the high carbon low alloy steel (#4) annealed at 1000 ℃, oil quenched at 950 ℃ and tempered at 250 ℃ shows obvious river pattern and cleavage fracture characteristics. At high magnification (Fig. 3-7 (H)), a small number of shallow dimples are observed in the fracture center, but the samples still belong to brittle fracture. Fig. 3-7 (I) (J) shows the tensile fracture morphology of as-cast high carbon low alloy steel (#5) with obvious river pattern and obvious cleavage fracture characteristics. It belongs to brittle fracture, and the toughness of the sample is the worst.
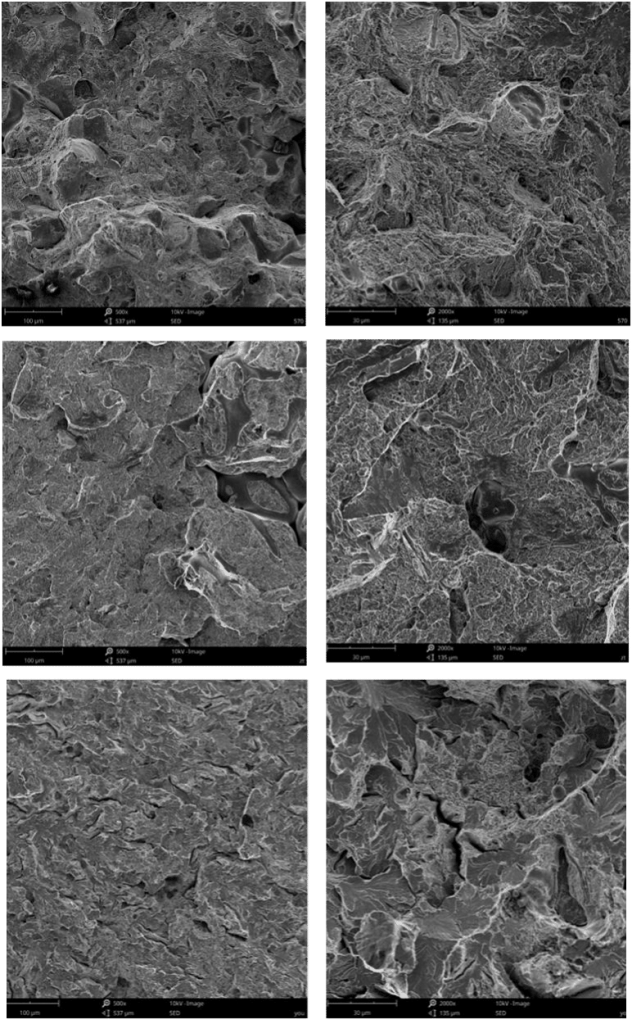
Fig.3-7 Fracture morphologies of medium carbon high chromium alloy steels in different heat treatment processes (a)(b)#1,(c)(d)#2,(e)(f)#3
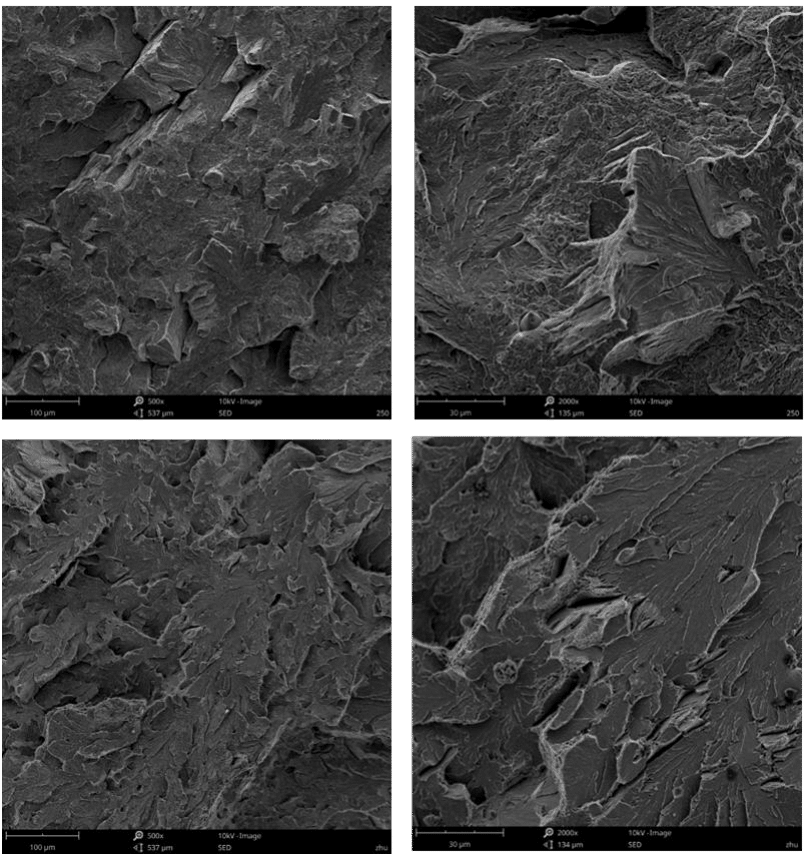
Fig.3-7 Fracture morphologies of medium carbon high chromium alloy steels in different heat treatment processes (g)(h)#4,(i)(j)#5
High carbon low alloy wear-resistant alloy steel with composition of c0.65%, Si 0.54%, Mn 0.97%, Cr 2.89%, Mo 0.35%, Ni 0.75% and N 0.10% were subjected to four different heat treatments. The effects of different heat treatments on the Microstructure and mechanical properties of high carbon low alloy steel were studied. The heat treatment methods of high carbon low alloy steel are as follows: 1000 ℃× 6h annealing + 950 ℃× 2.5h normalizing + 570 ℃× 2.5h tempering; 1000 ℃× 6h annealing + 950 ℃× 2.5h normalizing + 250 ℃× 2.5h tempering; 1000 ℃× 6h annealing + 950 ℃× 2.5h oil quenching + 570 ℃× 2.5h tempering; 1000 ℃× 6h annealing + 950 ℃× 2.5h oil quenching + 250 ℃× 2.5h tempering. The results show that:
- The microstructure of high carbon low alloy steel (# 1) annealed at 1000 ℃, normalized at 950 ℃ and tempered at 570 ℃ is pearlite. The microstructure of high carbon low alloy steel (# 2) annealed at 1000 ℃, normalized at 950 ℃ and tempered at 250 ℃ is also pearlite. However, the pearlite structure of # 1 is passivated and tends to be spheroidized, and its comprehensive properties are better than that of # 2. The microstructure of high carbon low alloy steel (sample 3) annealed at 1000 ℃, oil quenched at 950 ℃ and tempered at 570 ℃ is tempered sorbite with martensite orientation. The microstructure of high carbon low alloy steel (# 4) annealed at 1000 ℃, oil quenched at 950 ℃ and tempered at 250 ℃ is tempered martensite.
- The hardness of high carbon low alloy steel (# 4) annealed at 1000 ℃, oil quenched at 950 ℃ and tempered at 250 ℃ has the highest Rockwell hardness of 57.5 HRC. The hardness of the other three kinds of high carbon low alloy steel is lower than that of sample 4, and the hardness values are close. The hardness of samples 1,2,3 is 43.8 HRC, 45.3 HRC, and 44.3 HRC.
- The V-notch impact toughness test shows that the high carbon low alloy steel (# 1) annealed at 1000 ℃, normalized at 950 ℃, and tempered at 570 ℃ has the highest impact absorption energy (8.37 J) and the best toughness. The tensile test results also show that the elongation after fracture δ of high carbon low alloy steel (# 1) annealed at 1000 ℃, normalized at 950 ℃ and tempered at 570 ℃ has the maximum elongation after fracture (14.31%), and the fracture is a ductile fracture.
- The results of the tensile test show that the strength of high carbon low alloy steel (# 3) annealed at 1000 ℃, oil quenched at 950 ℃ and tempered at 570 ℃ has the best strength (Rm: 1269mpa, Rel: 1060mpa), the strength of # 1,# 2,# 3,and # 4 is Rm: 1005 MPa, Rel: 850 MPa; Rm: 947 MPa, Rel: 740 MPa; Rm: 671 MPa.
- The mechanical properties of as-cast high carbon low alloy steel (# 5) are worse than that of the heat-treated samples. Heat treatment improves the comprehensive properties of high carbon low alloy steel.
4.0 Microstructure and mechanical properties of wear-resistant bainitic steel, pearlite steel, and high manganese steel matrix composite mill liners
In order to compare and study the wear-resistant and corrosion-resistant alloy steel for the lining plate of the semi-autogenous mill, taking high-carbon alloy steel as the basic orientation, our factory designed three kinds of high-carbon alloy steel and their composite materials and made lining plates. The casting and heat treatment was completed in our factory, and the preliminary trial was made in metal mines.
The chemical composition of bainitic steel, pearlite steel, and high manganese steel matrix composite mill liners is shown in table 4-1, Table 4-2, and Table 4-3.
| Table4-1 The chemical composition of bainite steel liner plates (wt.%) | |||||||
| C | Si | Mn | P | S | Cr | Mo | Ni |
| 0.687 | 1.422 | 0.895 | 0.053 | 0.029 | 4.571 | 0.424 | 0.269 |
| Table 4-2 The chemical composition of pearlite steel liner plates (wt.%) | |||||||
| C | Si | Mn | Al | W | Cr | Cu | Ni |
| 0.817 | 0.43 | 0.843 | 0.028 | 0.199 | 3.103 | 0.111 | 0.202 |
| Table 4-3 The chemical composition of high manganese steel matrix composite liner plates (wt.%) | |||||||
| C | Si | Mn | Al | Cr | V | Ti | Ni |
| 1.197 | 0.563 | 20.547 | 0.271 | 0.143 | 0.76 | 0.232 | 0.259 |
After the bainite steel liner, pearlite steel liner, and high manganese steel matrix composite liner are removed, the samples for microstructure observation, hardness test, impact test, tensile test, and impact corrosion abrasive wear test are cut by wire cutting machine.
4.1 Microstructure and mechanical properties of bainitic steel, pearlite steel, and high manganese steel matrix composite mill liners
4.1.1 Microstructure
Figure 4-1 shows the metallographic structure of the bainite steel lining plate, and Figure 4-1 (a) (b) shows the metallographic structure of the non-wear surface. The black needle-like lower bainite structure (see arrow in Figure 4-1 (b)), feather-like upper bainite structure (see Figure 4-1 (b) circle), and some white retained austenite can be observed. Fig. 4-1 (c) (d) shows the metallographic structure of the wear surface. The black needle-like lower bainite structure and some white retained austenite can be observed. The black needle-like lower bainite on the non-wear surface is finer than the wear surface.
Figure 4-2 shows the XRD diffraction pattern of the bainite steel lining plate. The diffraction pattern of the bainitic steel sample shows the diffraction peaks of the α phase and γ phase, and there is no obvious diffraction peak of carbide in the diagram.
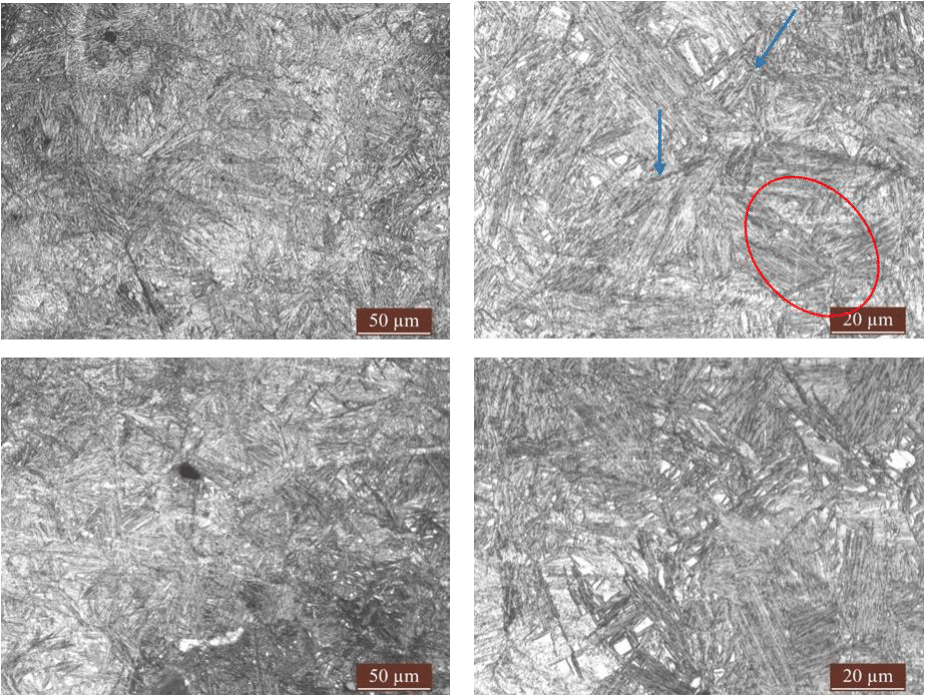
Fig.4-1 Microstructure of bainitic steel liner plates (a)(b)non-wear surface;(c)(d)wear surface
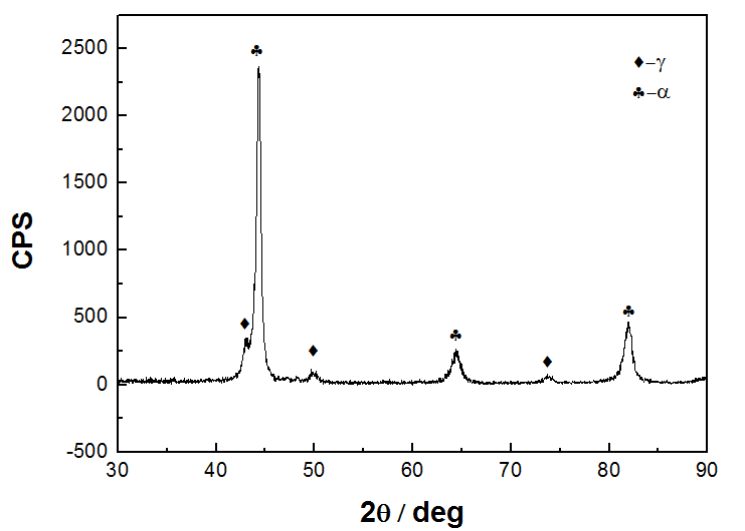
Fig.4-2 XRD patterns of bainitic steel liner plates
Fig. 4-3 shows the metallographic structure of the high manganese steel matrix composite lining plate, FIG. 4-3 (a) shows macrograph, FIG. 4-3 (b) shows a high magnification diagram, and Fig. 4-3 (b) shows a large number of carbides on the austenite grain boundary. On the surface of the polished and corroded high manganese steel matrix composite lining plate sample, 10 metallographic pictures with the magnification of 100 times were taken respectively (see Fig. 4-4). The area fraction of carbides in the field of vision was analyzed by using the software Las phase expert software of Lycra metallographic microscope, and the arithmetic average value was taken. According to the calculation, the carbide content in the high manganese steel matrix composite liner is 9.73%. Carbides are dispersed in austenite as the second phase, which improves the wear resistance and yield strength of the material. The high manganese steel matrix composite liner material is a composite material with austenite structure as the matrix and carbide as the second phase.
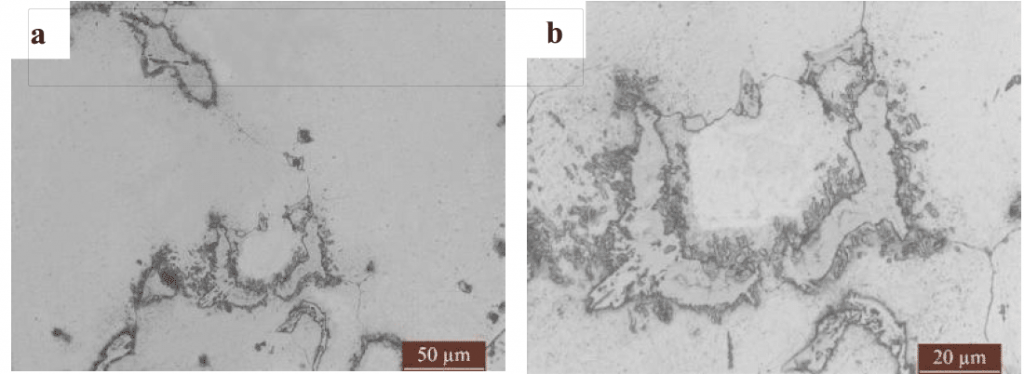
Fig.4-3 Microstructure of high manganese steel matrix composite liner plates
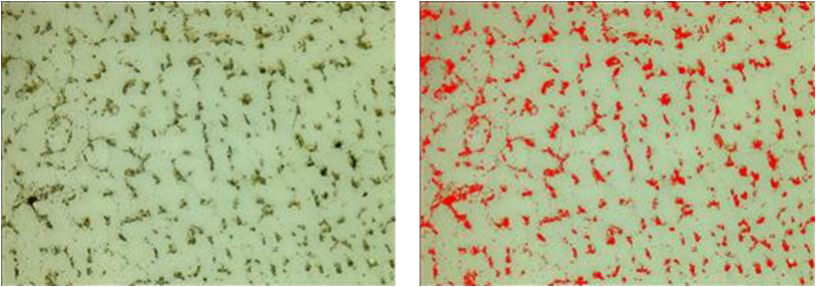
Fig.4-4 Statistical processing chart of carbide software for high manganese steel matrix composite liner plates
Fig. 4-4 shows the XRD diffraction pattern of high manganese steel matrix composite lining plate, in which there are diffraction peaks of γ phase and carbide, but no diffraction peak of martensite.
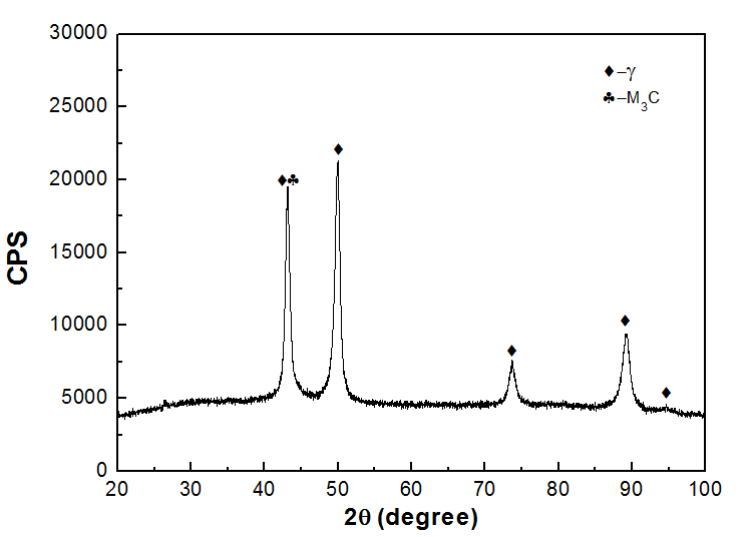
Fig.4-5 XRD patterns of high manganese steel matrix composite liner plates
Fig. 4-6 shows the microstructure of pearlite steel liner, and Fig. 4-6 (a) (b) shows the metallographic structure taken by Lycra metallographic microscope. It can be observed that the pearlite structure is black and white (see Fig. 4-6 (b) black circle). The white area is ferrite and the black is cementite. Fig. 4-6 (c) shows the high-power microstructure of SEM. Pearlite with bright and dark phases can be seen. The lighter part is cementite and the darker part is ferrite.
Figure 4-7 shows the XRD diffraction pattern of the pearlite steel mill liners. There are diffraction peaks of the α phase and Fe3C phase in the diffraction pattern of the pearlite mill liners, and no obvious residual austenite peak appears.
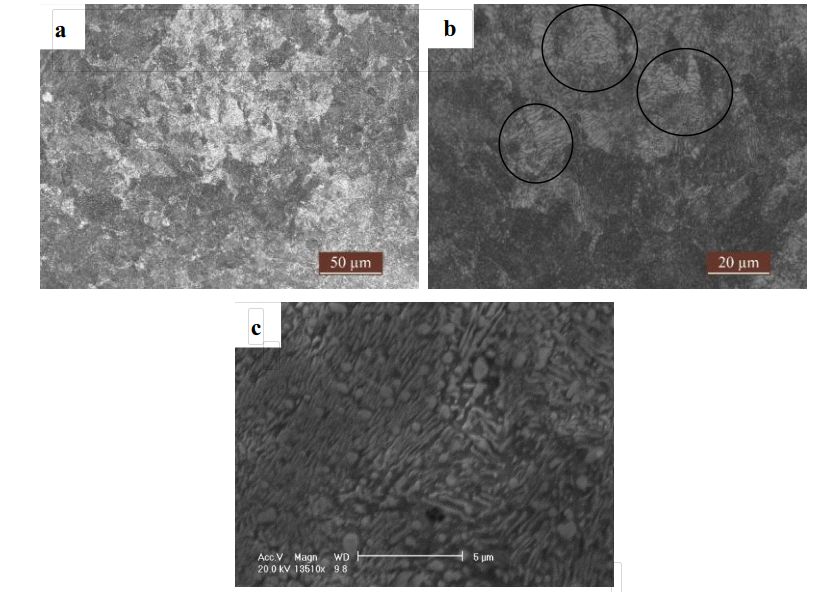
Fig.4-6 Microstructure of Pearlite alloy liner plates
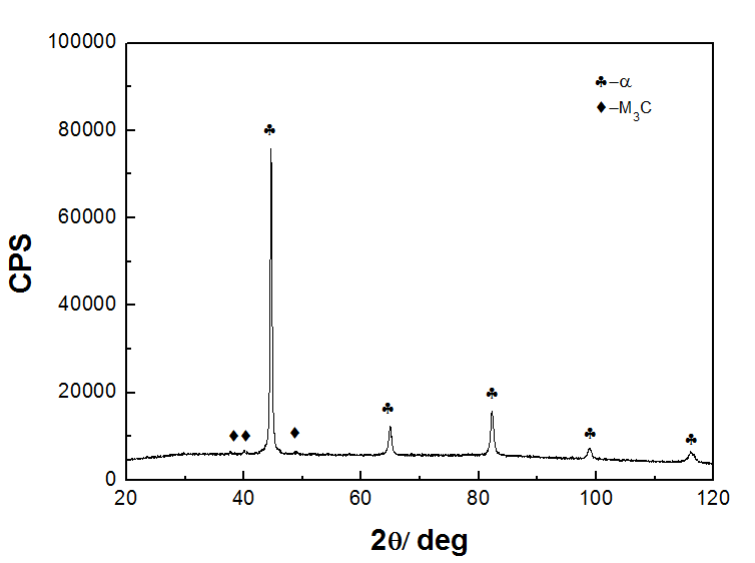
Fig.4-7 XRD patterns of pearlite alloy liner plates
4.1.2 Mechanical properties
Table 4-4 shows the test results of hardness and impact toughness of bainite steel liner, high manganese steel matrix composite liner, and pearlite steel liner. The results show that the bainite steel liner has good matching properties of hardness and toughness; the high manganese steel matrix composite has poor hardness but good toughness without work hardening; the toughness of pearlite steel is poor.
| Table 4-4 Rockwell hardness and impact toughness of three kinds of alloy steel mill liners | |
| Item | Result |
| Hardness of bainitic alloy steel mill liners (HRC) | 51.7 |
| Hardness of high manganese steel matrix composite alloy steel mill liners (HRC) | 26.5 |
| Hardness of pearlite alloy steel mill liners (HRC) | 31.3 |
| V-notch impact absorption energy of bainitic alloy steel mill liners (J) | 7.5 |
| U-notch impact absorption energy of high manganese steel matrix composite alloy steel mill liners (J) | 87.7 |
| Impact absorption energy of pearlite alloy steel mill liners with V-notch (J) | 6 |
Figure 4-8 is a comparison of hardness distribution in the hardened layer area of three kinds of liner materials, namely bainite steel liner, high manganese steel base composite lining plate, and pearlite steel liner. The results show that the high manganese steel-based composite lining plate and bainite steel liner have obvious hardening phenomenon after a trial in the mine. The processing hardening depth of the high manganese steel-based composite liner is 12 mm, and the hardness of the lining plate is increased to 667 HV (58.7 HRC); the processing hardening depth of bainite steel liner is 10 mm, the hardness of HVS was increased by nearly 50% by machining hardening, and there was no obvious hardening phenomenon in pearlite steel liner.
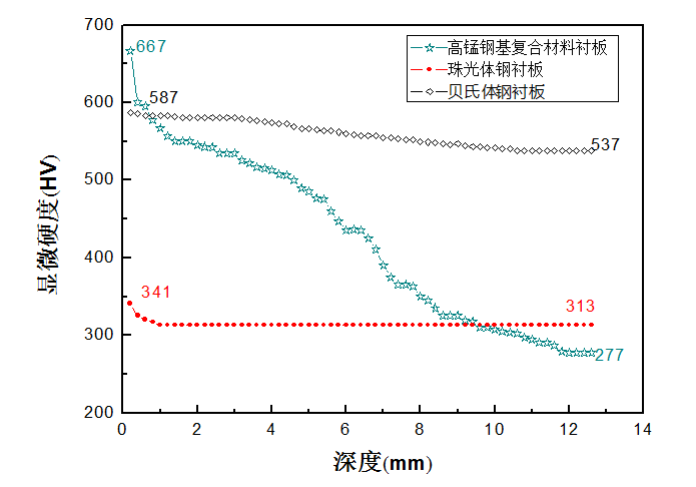
Fig.4-8 Contrast diagram of hardness distribution in three kinds of hardened layer of liner steels
Table 4-5 shows the tensile test results of high manganese steel matrix composite mill liners and pearlite steel mill liners. The results show that the tensile strength of pearlite steel matrix composite mill liners is equivalent to that of high manganese steel matrix composite material mill liners, but the high manganese steel matrix composite material lining plate has higher yield strength than pearlite steel mill liners. At the same time, the elongation after fracture of pearlite steel liner is higher than that of manganese steel matrix composite, and the liner of high manganese steel matrix composite material has better toughness.
| Table 4-5 Tensile test results of different alloy steel mill liners | |||
| Item No. | Tensile strength / Mpa | Elongation after fracture /% | Yield strength / Mpa |
| High manganese steel matrix composite liner | 743 | 9.2 | 547 |
| Pearlite steel liner | 766 | 6.7 | 420 |
4.1.3 Impact fracture analysis
Fig. 4-9 shows the impact fracture morphology of bainite steel liner, high manganese steel matrix composite liner, and pearlite steel liner. Fig. 4-9 (a) (b) shows the impact fracture morphology of bainite steel liner material. The fracture surface is relatively flat with a small number of tear edges and high magnification (Fig. 4-9 (a)) The fracture toughness of the dimples (B-9) is shallow, but the fracture energy is small. Fig. 4-9 (c) (d) shows the morphology of impact fracture of high manganese steel matrix composite liner material. From the low magnification (Fig. 4-9 (c)), obvious plastic deformation is observed on the fracture surface, and dimples appear on the cross-section. At high magnification (Fig. 4-9 (d)), large and small dimples can be observed at the same time, and the large dimples are deep, and the dimples are entangled with each other. Figure 4-9 (E) (f) shows the impact fracture morphology of pearlite steel liner material. The fracture surface is relatively flat under low magnification (Fig. 4-9 (E)), while the river pattern can be observed at high magnification (Fig. 4-9 (f)). At the same time, a small number of dimples can be observed at the edge of the river pattern. The sample is brittle fracture in the macro view and plastic fracture in the local part in the micro view.
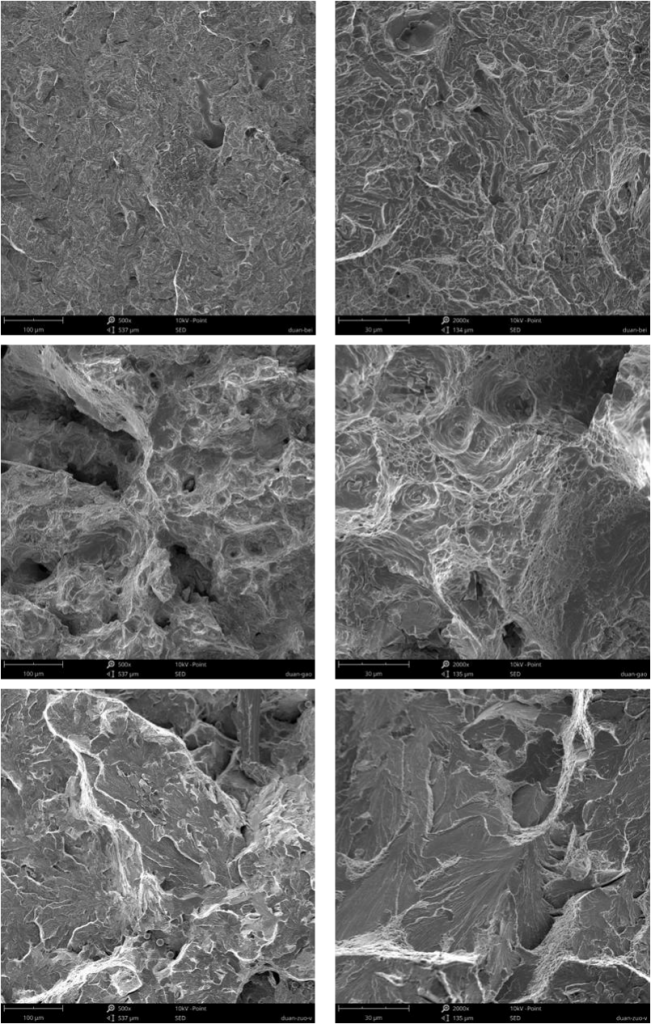
Fig. 4-9 impact fracture morphology of three kinds of lining steels (a) (b) bainite steel liner plates; (c) (d) high manganese steel matrix composite liner plates; (e) (f) pearlite steel liner plates
4.1.4 Tensile fracture analysis
Figure 4-10 shows the tensile fracture morphology of high manganese steel matrix composite lining plate and pearlite steel lining plate and figure 4-10 (a) (b) shows the tensile fracture morphology of high manganese steel matrix composite lining plate material. From the low power (Fig. 4-10 (a)), the fracture has obvious plastic deformation, a small amount of tear edge, and high magnification (Fig A small number of shallow dimples and a large number of cleavage steps can be observed in 4-10 (b). The specimen belongs to mixed fracture mode. Fig. 4-10 (c) (d) shows the tensile fracture morphology of pearlite steel liner material. The fracture surface is relatively flat when observed at low magnification (Fig. 4-10 (c)). The obvious river pattern and tear edge can be observed at high magnification (Fig. 4-10 (d)). The sample belongs to a brittle fracture.
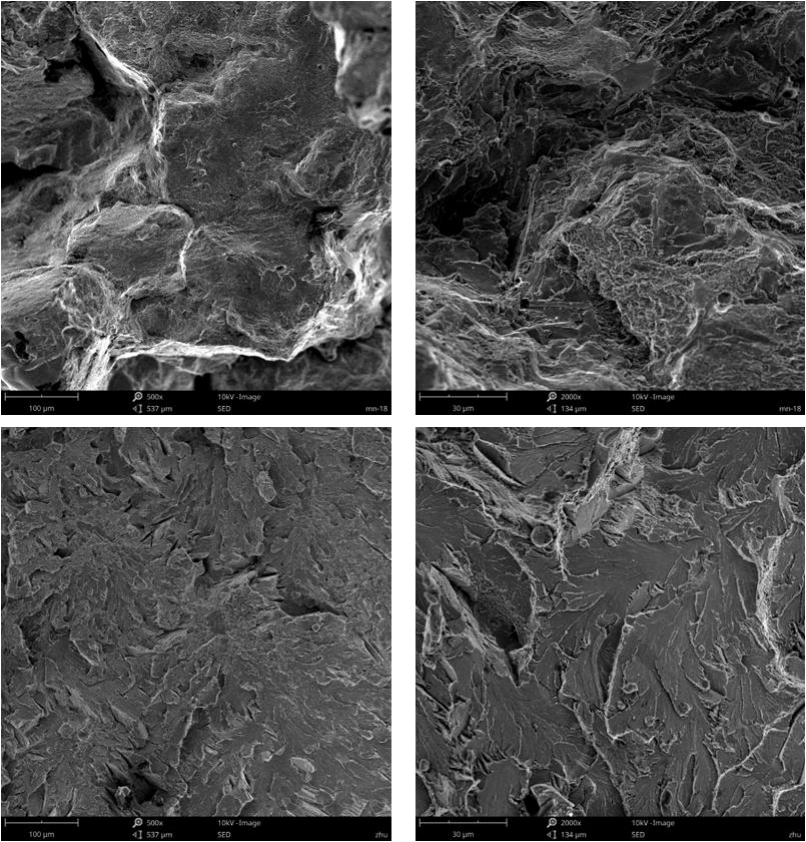
Fig. 4-10 Fracture morphologies of three kinds of lining steels (a)(b) high manganese steel matrix composite liner plates; (c) (d) pearlite steel liner plates
4.2 The results
- The microstructure of the bainitic alloy steel mill liners shows black needle-like lower bainite and part of feather-like upper bainite, with a hardness of 51.7 HRC. After the mill liner has been tested in mines, it has a certain work hardening depth of 10 mm. The hardness of the mill liner is increased by 50 HV. The impact energy absorbed by the V-notch of bainite steel liner is 7.50 J, and the fracture surface is a ductile fracture. The bainite alloy steel mill liners have good comprehensive mechanical properties.
- The microstructure of the high manganese steel matrix composite mill liner is austenite structure. There are a lot of carbides in the austenite grain boundary, and the content of carbide is 9.73%. The liner material of high manganese steel matrix composite material is a composite material with austenite structure as matrix and carbide as the second phase. The hardness of the high manganese steel matrix composite liner is 26.5 HRC without work hardening. After being used in mines, obvious work hardening occurs. The depth of work hardening is 12 mm. The highest hardness is 667 HV (58.7 HRC). The impact absorbed energy of standard u-notch of high manganese steel matrix composite liner is 87.70 J, and the impact fracture is a ductile fracture. The elongation after tensile fracture of the high manganese steel matrix composite liner is 9.20%, and the tensile fracture is a mixed fracture. The high manganese steel matrix composite mill liner has good toughness. The tensile strength and yield strength of high manganese steel matrix composite mill liners are 743 MPa and 547 MPa.
- The results show that the microstructure of pearlite alloy steel mill liners are typically black and white pearlite structure with a hardness of 31.3hrc, and there is no obvious work hardening phenomenon after trial use in mines. The impact absorption energy of standard V-notch of pearlite steel liner is 6.00j, and the fracture surface is a microlocal plastic fracture and macro brittle fracture. The elongation of pearlite steel liner after tensile fracture is 6.70%, the tensile fracture is a brittle fracture, the toughness is high, and the liner of manganese steel matrix composite is poor. The tensile strength and yield strength of pearlite steel liner are 766 MPa and 420 MPa.
5.0 Impact corrosion and abrasive wear resistance of semi-autogenous mill alloy steel mill liners
The mill liners of the semi-autogenous mill are not only impacted and worn by slurry but also corroded by slurry in the drum, which greatly reduces the service life of the liner. The impact corrosion abrasive wear test can well simulate the wear condition of the lining plate of the semi-autogenous mill. At present, the research on wear resistance and corrosion performance of materials is mainly to measure the abrasion weight loss of materials in impact corrosion abrasive wear test under three-body wear conditions, and then observe the wear morphology of samples by scanning electron microscope, and then analyze the wear mechanism. In this chapter, the wear resistance and wear mechanism of different samples are analyzed through the impact corrosion abrasive wear loss, and morphology of heat-treated high carbon low alloy corrosion-resistant steel, bainite steel liner, pearlite steel liner, and high manganese steel matrix composite liner.
5.1 Abrasive wear characteristics of impact corrosion at 4.5 J impact energy
5.1.1 impact corrosion abrasive wear resistance
Under the effect of impact energy of 4.5j, the wear weight loss of high carbon low alloy corrosion-resistant steel, bainite steel liner, pearlite steel liner, and high manganese steel matrix composite lining plate in different heat treatment states with impact corrosion abrasive wear time is shown in Fig. 5-1.
- The results show that the weight loss of each sample increases with time, and the wear rate is stable;
- The wear resistance of each sample is as follows: bainite steel liner plate > 1000 ℃ annealing +950 ℃ normalizing +570 ℃ tempered high carbon low alloy steel > 1000 ℃ annealing +950 ℃ oil quenching +250 ℃ tempered high carbon low alloy steel > pearlite steel liner > 1000 ℃ annealing +950 ℃ normalizing +250 ℃ tempering high carbon low alloy steel > 1000 ℃ annealing +950 ℃ oil quenching +570 ℃ tempering high carbon low alloy steel > high manganese steel base composite mill liners.
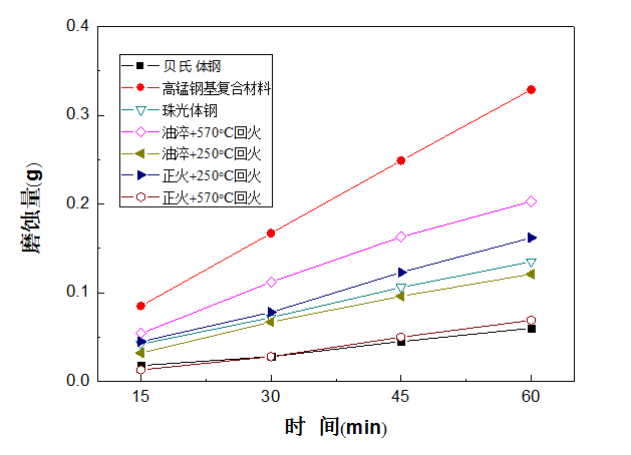
Fig.5-1 The worn loss weight of different lining alloy steels under 4.5J impact energy
5.1.2 Analysis of abrasion mechanism
There are two main wear mechanisms of impact abrasive wear: one is the wear caused by abrasive cutting and chiseling; the other is fatigue wear caused by repeated pitting deformation under the impact force. Under the wet grinding condition, impact abrasive wear is mainly abrasive wear loss and accompanied by electrochemical corrosion, which promotes each other and accelerates the wear rate of materials.
Figure 5-2 shows the wear surface morphology of high carbon low alloy corrosion-resistant steel and bainite steel liner, pearlite steel liner, and high manganese steel matrix composite material lining plate under different heat treatment states.
Fig. 5-2 (a) (b) shows the wear morphology of 1R sample, that is, the high carbon low alloy steel annealed at 1000 ℃ and normalized at 950 ℃ and tempered at 570 ℃. At low magnification (Fig. 5-2 (a)), the wear surface of the sample is relatively flat. At high magnification (Fig. 5-2 (b)), cutting furrows can be observed, and a small amount of fatigue spalling pits appear on the worn surface. The specimen is mainly a micro-cutting mechanism. The sample is pearlite with a hardness value of 43.7 HRC and has certain cutting resistance. At the same time, the sample has a strong toughness. During the process of impact corrosion abrasive wear, it can produce large plastic deformation. Before plastic deformation fatigue spalling, it transforms into a plastic deformation wedge and plastic ridge under the action of impact force and quartz sand. There is no obvious corrosion on the worn surface of the sample, which indicates that the corrosion resistance of the sample is good.
Fig. 5-2 (c) (d) shows the wear morphology of the 2R sample, that is, the high carbon low alloy steel annealed at 1000 ℃ and normalized at 950 ℃ and tempered at 250 ℃. At low magnification (Fig. 5-2 (c)), the wear surface of the sample is relatively flat. At high magnification (Fig. 5-2 (d)), wide and shallow cutting furrows can be observed, and obvious plastic deformation wedge, plastic ridge, and some cutting chips caused by plastic deformation can be seen, At the same time, a small amount of spalling pits appear, which is mainly micro-cutting mechanism, accompanied by a small amount of plastic deformation fatigue spalling. There is no obvious corrosion on the worn surface of the sample, which indicates that the corrosion resistance of the sample is good.
Fig. 5-2 (E) (f) shows the wear morphology of the 3R sample, that is, the high carbon low alloy steel annealed at 1000 ℃, quenched at 950 ℃ and tempered at 570 ℃. At low magnification (Fig. 5-2 (E)), the wear surface of the sample is relatively flat with some debris. At high magnification (Fig. 5-2 (f)), a large number of irregular spalling pits can be observed. The wear mechanism of the sample is the plastic fatigue spalling mechanism. There is no obvious corrosion on the worn surface of the sample, which indicates that the corrosion resistance of the sample is good.
Fig. 5-2 (g) (H) shows the wear morphology of the 4R sample, that is, the high carbon low alloy steel annealed at 1000 ℃ and quenched at 950 ℃ and tempered at 250 ℃. At low magnification (Fig. 5-2 (g)), the wear surface of the sample is relatively flat. At high magnification (Fig. 5-2 (H)), shallow and shortcutting furrows can be observed. Because the sample is tempered martensite, its hardness reaches 57.5 HRC has strong cutting resistance. A large number of irregular spalling pits can be observed at the same time on the worn surface. The plasticity of the sample is low. Under the action of periodic stress, repeated plastic deformation occurs, forming stress concentration source, fatigue crack, and finally fatigue spalling. The wear mechanism of the sample is plastic fatigue spalling. There is no obvious corrosion on the worn surface of the sample, which indicates that the corrosion resistance of the sample is good.
Fig. 5-2 (I) (J) shows the abrasion morphology of the 5R sample, i.e. bainite steel liner material. At low magnification (Fig 5-2 (J)) can be observed that long cutting furrows and shortcutting furrows exist at the same time, and a small amount of irregular spalling pits can be seen. The micro-cutting mechanism of the sample is mainly micro-cutting. The sample is bainitic structure, has good hard toughness matching, high hardness value (51.3 HRC), and certain cutting resistance; at the same time, the sample has strong toughness, which can produce large plastic deformation and a small number of spalling pits in the process of impact corrosion abrasive wear. Therefore, the impact corrosion abrasive wear resistance of the sample is the best. There is no obvious corrosion on the worn surface of the sample, which indicates that the corrosion resistance of the sample is good.
Fig. 5-2 (k) (L) shows the abrasion morphology of 6R sample, i.e. high manganese steel matrix composite liner material, at low magnification (Fig. 5-2) (k) (the wear surface of the sample is relatively flat, a small amount of cutting furrows can be observed, and long and deep cutting furrows and part of wear debris can be observed at high times (Fig. 5-2 (L)), indicating that the anti-cutting ability of the sample is poor, and a large number of irregular spalling pits can be observed on the worn surface, and the micro-cutting mechanism is the main mechanism of the sample. There is no obvious corrosion on the worn surface of the sample, which indicates that the corrosion resistance of the sample is good. The hardness of the sample is low without work hardening. It can not get enough work hardening hardness under the impact energy of 4.5j. Therefore, the cutting resistance of the sample is poor, and the impact of corrosion abrasive wear resistance is the worst.
Fig. 5-2 (m) (n) shows the abrasion morphology of the 7R sample, i.e. pearlite steel liner material. At low magnification (Fig. 5-2 (m)), the abrasion surface of the sample is relatively flat, and a small number of spalling pits can be observed. At high magnification (Fig 5-2 (n)) can observe deep cutting furrow and wear debris, and the anti-cutting ability of the sample is poor. Some irregular spalling pits can be observed around the cutting furrow and debris. The micro-cutting mechanism and fatigue spalling proportion of the sample is similar. There is no obvious corrosion on the worn surface of the sample, which indicates that the corrosion resistance of the sample is good.
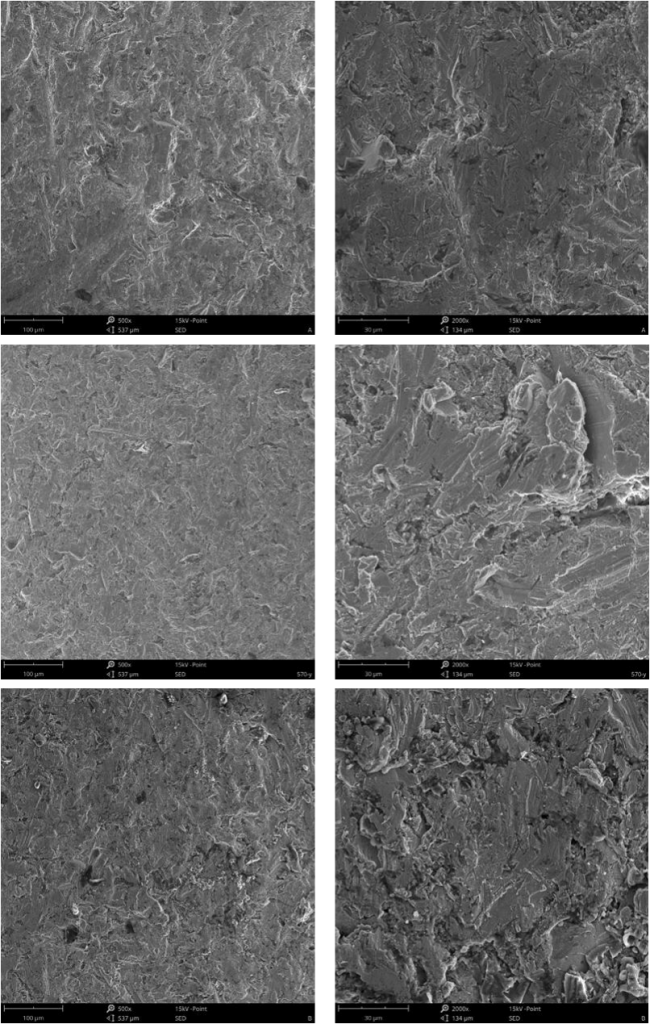
Fig.5-2 The worn surface morphology of different lining alloy steels under 4.5J impact energy (a)(b)1R; (c)(d)2R; (e)(f)3R
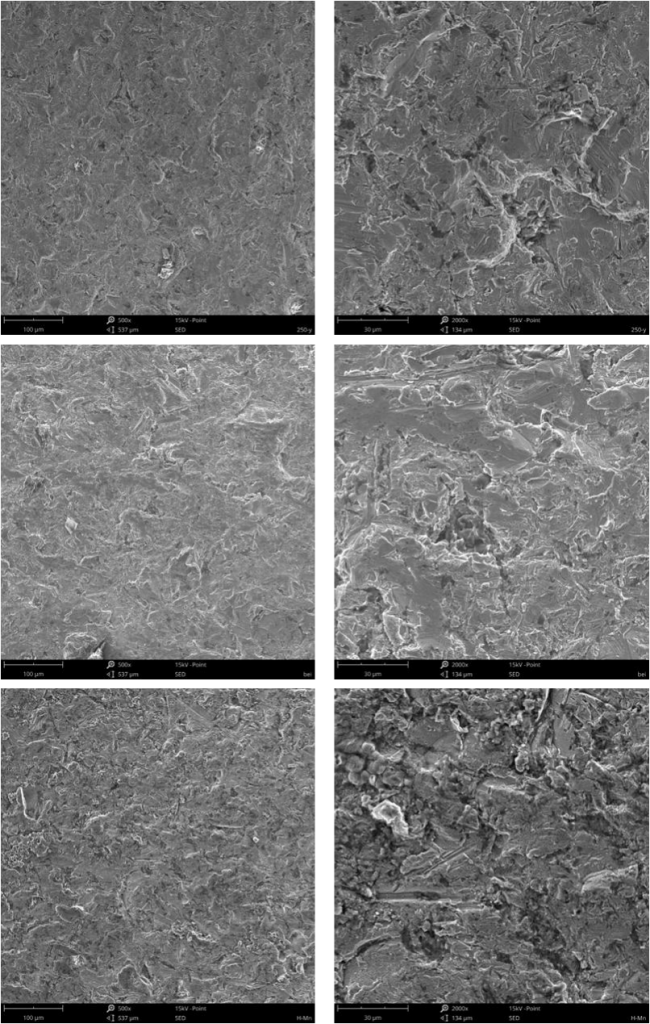
Fig.5-2 The worn surface morphology of different lining alloy steels under 4.5J impact energy (g)(h)4R; (i)(j)5R; (k)(l)6R
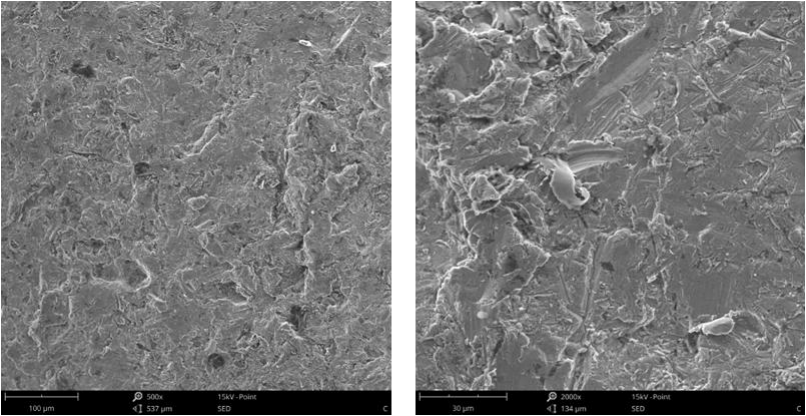
Fig.5-2 The worn surface morphology of different lining alloy steels under 4.5J impact energy (m)(n)7R
In conclusion, in the impact corrosion abrasive wear test under 4.5j impact energy, some samples are mainly micro-cutting wear mechanisms, some samples are mainly fatigued spalling wear mechanisms, and some samples are equally stressed on the two wear mechanisms. The impact erosion resistance of the specimens is determined by the two mechanisms, namely, hardness and toughness. According to the test results, bainitic steel has the best matching of hardness and toughness and the best impact and abrasion resistance. The wear resistance of high manganese steel matrix composite liner is the worst because it can not get enough work hardening. This result is consistent with the result of abrasion weight loss.
5.1.3 Work hardening effect of wear-resistant alloy steels under impact energy of 4.5J
In order to explore the work hardening effect of different wear-resistant alloy steels, the microhardness gradual change curve of the worn subsurface layer of different wear-resistant alloy steels under impact energy of 4.5j was measured, that is, the impact wear work-hardening curve. Figure 5-3 shows the work hardening curves of high carbon low alloy corrosion-resistant steel, bainite steel liner, pearlite steel liner, and high manganese steel matrix composite lining plate under 4.5j impact energy.
It can be seen from the figure that under the condition of impact energy of 4.5j, different wear-resistant alloy steels have a certain degree of work hardening ability. The closer to the wear surface, the better the work hardening effect is; the farther away from the wear surface, the worse the work hardening effect; the hardening rate of high manganese steel matrix composite is the largest, and the hardness increases by nearly 264 The results show that the hardness of high carbon low alloy steel annealed at 1000 ℃, oil quenched at 950 ℃ and tempered at 250 ℃ has the highest hardness. The hardness of bainitic steel is second only to that of annealed at 1000 ℃, oil quenched at 950 ℃ and tempered at 250 ℃. However, the toughness of the former is better than that of the latter, and the former has relatively high hardness, so the former has a high hardness at 4.5j The results show that the wear resistance of bainitic steel is the best under impact energy, which is consistent with the result of corrosion wear quality analysis.
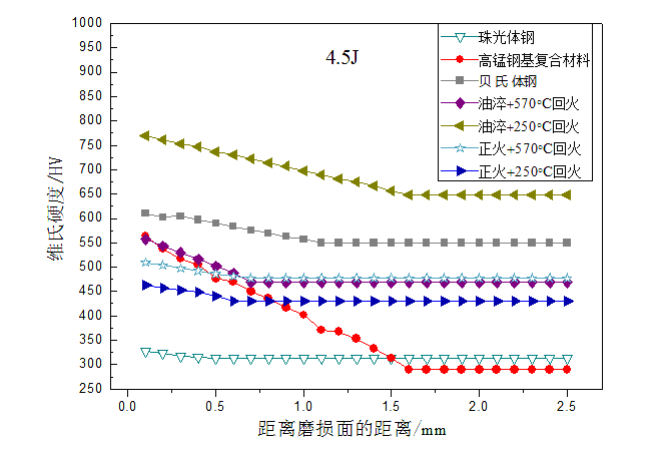
Fig.5-3 The strain hardening curves of different lining alloy steels under 4.5J impact energy
5.2 Wear characteristics of impact corrosion abrasive under 9J impact energy
5.2.1 impact corrosion abrasive wear resistance
Under the effect of 9j impact energy, the wear loss of high carbon low alloy corrosion-resistant steel, bainite steel liner, pearlite steel liner, and high manganese steel matrix composite lining plate in different heat treatment states with impact corrosion abrasive wear time is shown in Fig. 5-4
- The results show that the weight loss of each sample increases with time, and the wear rate is stable;
- The wear resistance and corrosion resistance of the samples from high to low are 1000 ℃ annealing + 950 ℃ normalizing + 570 ℃ tempering high carbon low alloy steel > bainitic steel liner plate ≥ 1000 ℃ annealing + 950 ℃ oil quenching + 570 ℃ tempering high carbon low alloy steel > 1000 ℃ annealing + 950 ℃ oil quenching + 250 ℃ tempering high carbon low alloy steel ≥ high manganese steel matrix composite material lining plate > 1000 ℃ annealing + 950 ℃ normalizing + 250 ℃ tempering high carbon low alloy steel ≥ pearlite steel liner.
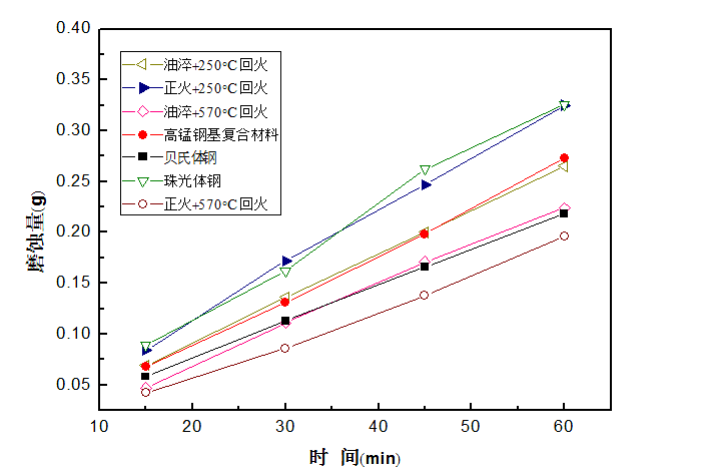
Fig.5-4 The worn loss weight of different lining alloy steels under 9J impact energy
5.2.2 Analysis of abrasion mechanism
Figure 5-5 shows the worn surface morphology of high carbon low alloy corrosion-resistant steel, bainite steel liner, pearlite steel liner, and high manganese steel matrix composite material lining plate under different heat treatment states.
Fig. 5-5 (a) (b) shows the abrasion morphology of the 1R sample, that is, the high carbon low alloy steel annealed at 1000 ℃ and normalized at 950 ℃ and tempered at 570 ℃. At low magnification (Fig. 5-5 (a)), the wear surface of the sample is relatively flat. At high magnification (Fig. 5-5 (b)), obvious cutting grooves can be observed, with deep grooves and a small number of fatigue spalling pits. The specimen shows the cutting wear mechanism of The main factor is fatigue spalling. There is no obvious corrosion on the worn surface of the sample, which indicates that the corrosion resistance of the sample is good.
Fig. 5-5 (c) (d) shows the wear morphology of 2R sample, i.e. 1000 ℃ annealing + 950 ℃ normalizing + 250 ℃ tempering high carbon low alloy steel. At low magnification (Fig. 5-5 (c)), the wear surface of the sample is relatively flat. At high magnification (Fig. 5-5 (d)), large and small cutting furrows can be observed at the same time, a small amount of cutting debris and a small amount of spalling can be observed around the large cutting furrow The results show that the main mechanism of the specimen is cutting, accompanied by a certain amount of fatigue spalling mechanism. There is no obvious corrosion on the worn surface, which indicates that the corrosion resistance of the sample is good.
Fig. 5-5 (E) (f) shows the abrasion morphology of the 3R sample, i.e. 1000 ℃ annealing + 950 ℃ oil quenching + 570 ℃ tempering high carbon low alloy steel. At low magnification (Fig. 5-5 (E)), the wear surface of the sample is relatively flat without obvious fatigue spalling pit. At high magnification (Fig 5-5 (f)), many obvious cutting furrows and some fatigue spalling pits were observed. The cutting mechanism of the sample was mainly a cutting mechanism, and there was a fatigue spalling mechanism at the same time. There is no obvious corrosion on the worn surface of the sample, which indicates that the corrosion resistance of the sample is good.
Fig. 5-5 (g) (H) shows the wear morphology of the 4R sample, i.e. 1000 ℃ annealing + 950 ℃ oil quenching + 250 ℃ tempering high carbon low alloy steel. At low magnification (Fig. 5-5 (g)), the wear surface of the sample is relatively flat. At high magnification (Fig. 5-5 (H)), many short and shallow small cutting furrows can be observed, and a small number of long and shallow small cutting furrows are also found. The fatigue spalling pits with different sizes are distributed on the worn surface. The fatigue spalling mechanism is the main mechanism of the specimen, and a small amount of cutting mechanism exists at the same time. There is no obvious corrosion on the worn surface of the sample, which indicates that the corrosion resistance of the sample is good.
Fig. 5-5 (I) (J) shows the abrasion morphology of the 5R sample, that is, bainite steel liner material. At low magnification (Fig. 5-5 (I)), the wear surface of the sample is relatively flat, and obvious cutting furrows can be seen. At high magnification (Fig 5-5 (J)). There is no obvious corrosion on the worn surface of the sample, which indicates that the corrosion resistance of the sample is good.
Fig. 5-5 (k) (L) shows the wear morphology of the 6R sample, i.e. high manganese steel matrix composite liner material. At low magnification (Fig. 5-5 (k)), the wear surface of the sample is relatively flat, and obvious cutting furrow can be observed. At high magnification (Fig. 5-5 (L)), the cutting furrow is shallow and some debris can be observed. Under this condition, the cutting furrow of wear surface is 4.5j Under the condition of impact energy, the sample is short and shallow, which indicates that the sample has a stronger anti-cutting ability in corrosive abrasive wear under high impact energy. Some irregular spalling pits can be observed on the worn surface, and the micro-cutting mechanism is the main mechanism of the sample. There is no obvious corrosion on the worn surface of the sample, which indicates that the corrosion resistance of the sample is good.
Fig. 5-5 (m) (n) shows the abrasion morphology of the 7R sample, that is, pearlite steel liner material. At low magnification (Fig. 5-5 (m)), the wear surface of the sample is relatively flat, and obvious spalling pits can be observed. At high magnification (Fig. 5-5 (n)), the fatigue spalling pits have traces of repeated plastic deformation, and a small amount of cutting furrows and wear debris can be observed. The fatigue spalling mechanism of the sample is mainly fatigue spalling. There is no obvious corrosion on the worn surface of the sample, which indicates that the corrosion resistance of the sample is good.
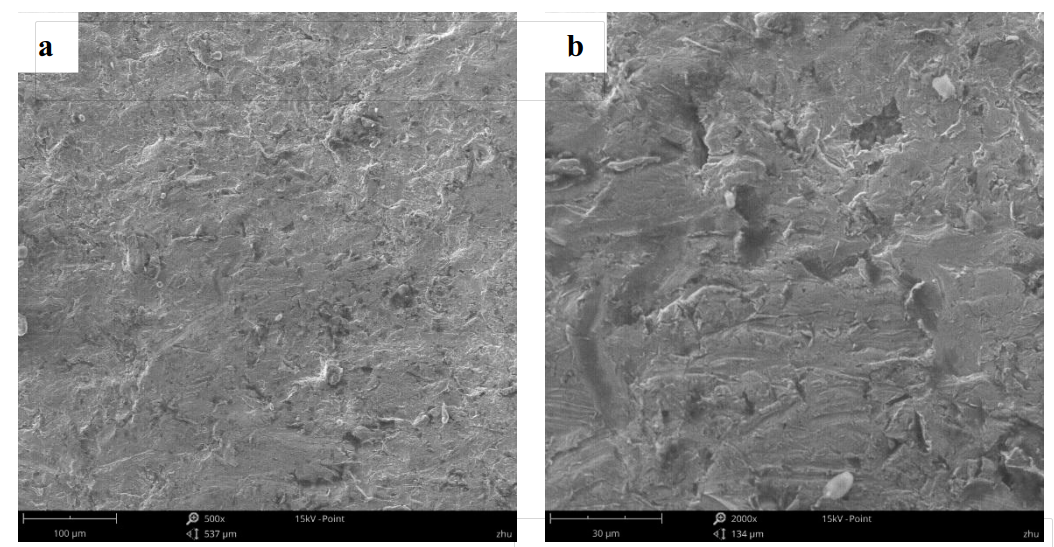
Fig.5-5 The worn surface morphology of different lining alloy steels under 9J impact energy (a)(b)1R
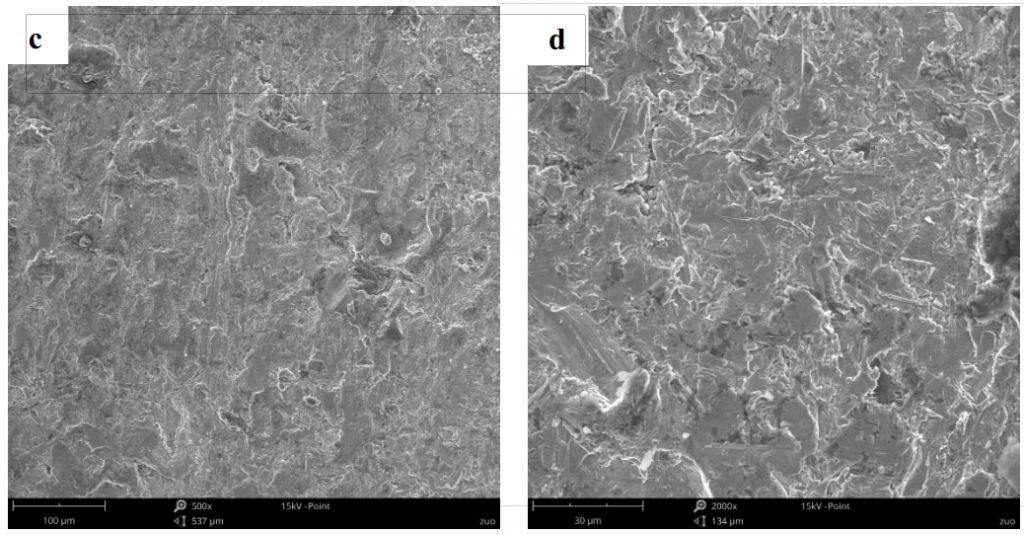
Fig.5-5 The worn surface morphology of different lining alloy steels under 9J impact energy (c)(d)2R
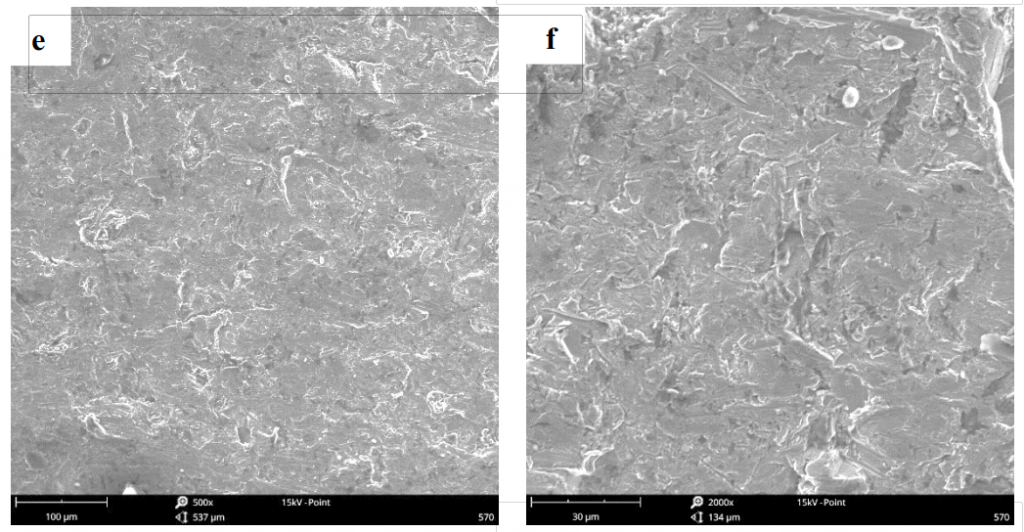
Fig.5-5 The worn surface morphology of different lining alloy steels under 9J impact energy (e)(f)3R
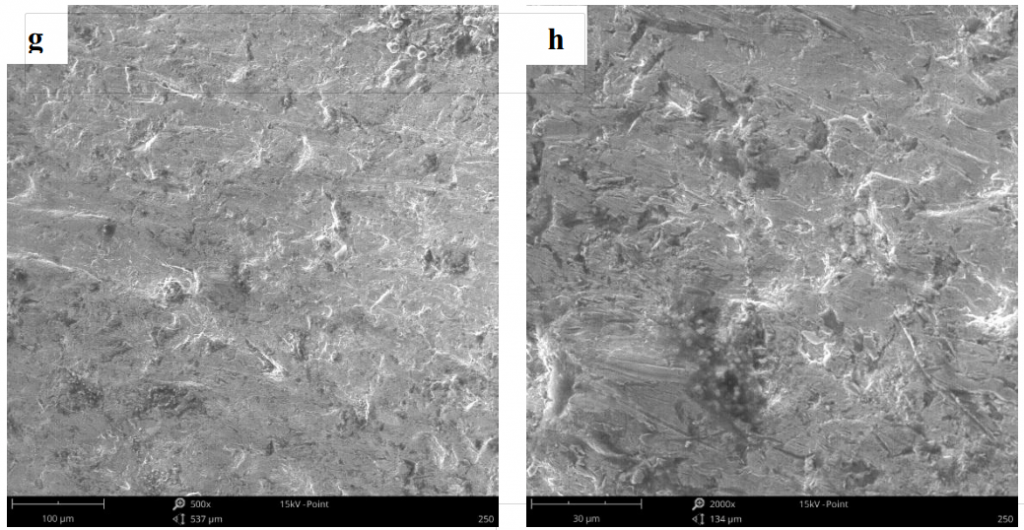
Fig.5-5 The worn surface morphology of different lining alloy steels under 9J impact energy (g)(h)4R
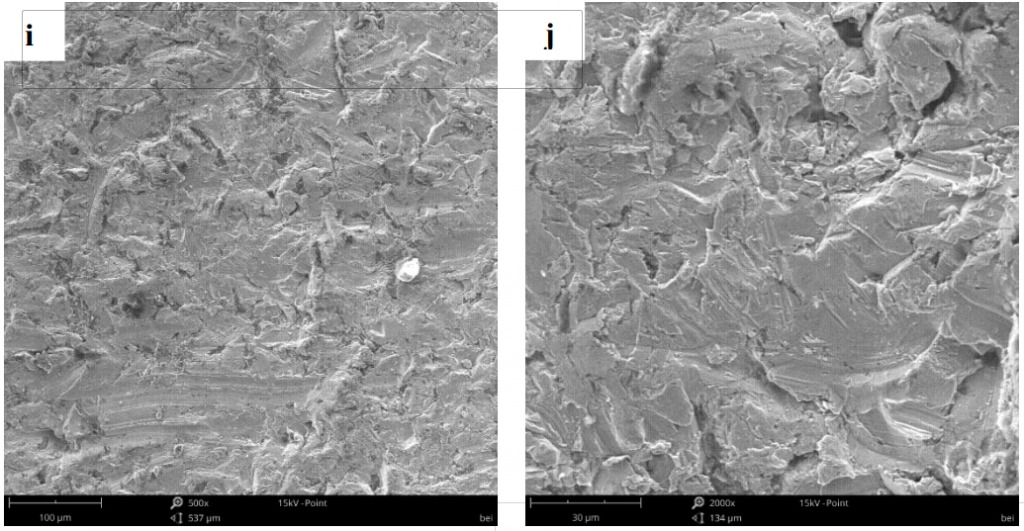
Fig.5-5 The worn surface morphology of different lining alloy steels under 9J impact energy (i)(j)5R
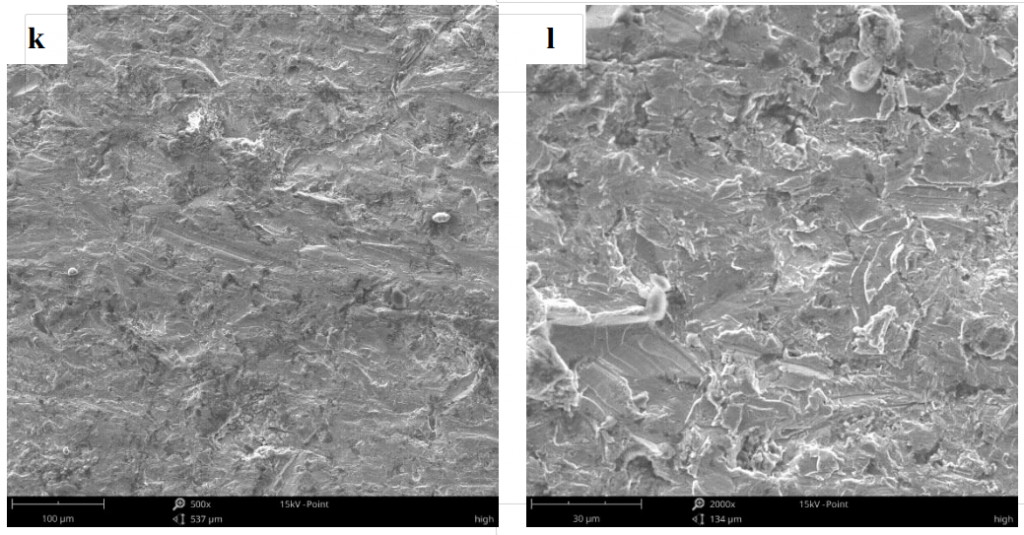
Fig.5-5 The worn surface morphology of different lining alloy steels under 9J impact energy (k)(l)6R
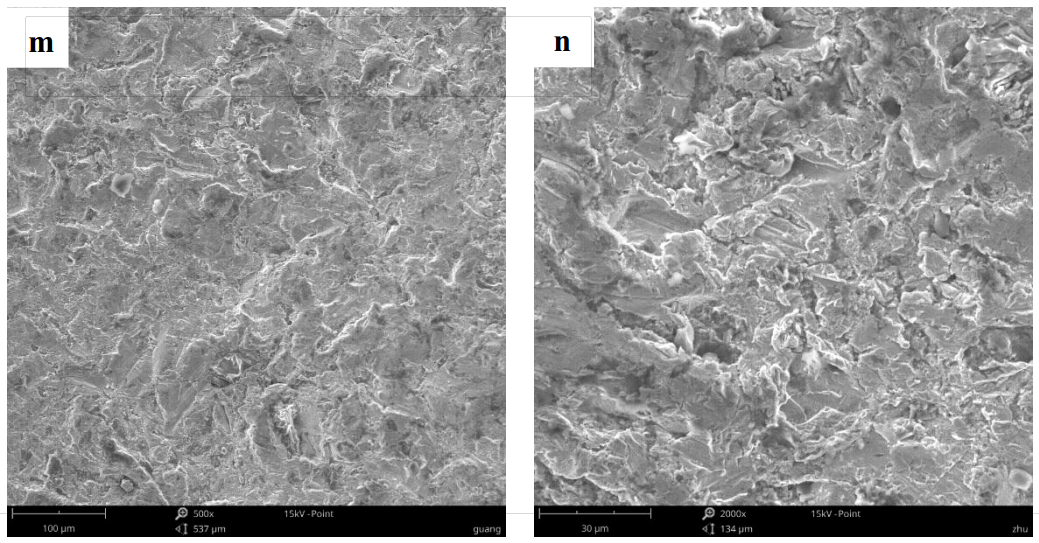
Fig.5-5 The worn surface morphology of different lining alloy steels under 9J impact energy (m)(n)7R
In conclusion, in the impact corrosion abrasive wear test under 9j impact energy, some samples are mainly micro-cutting wear mechanisms, and some samples are mainly fatigued spalling wear mechanisms. The impact erosion resistance of the specimens is determined by the two mechanisms, namely, hardness and toughness. According to the test results, the high carbon low alloy steel annealed at 1000 ℃, normalized at 950 ℃ and tempered at 570 ℃ has a good matching between hardness and toughness, and the toughness is the best, so the impact wear resistance is the best. The high manganese steel matrix composite material lining plate can obtain a certain work hardening under large impact energy, and its wear resistance and corrosion resistance are enhanced under this condition. This result is consistent with the result of abrasion weight loss.
5.2.3 Work hardening effect of wear-resistant alloy steels under 9J impact energy
Figure 5-6 shows the wear and work hardening curves of high carbon low alloy corrosion-resistant steel, bainite steel liner, pearlite steel liner, and high manganese steel matrix composite lining plate under 9j impact energy. It can be seen from the figure that under the condition of impact energy of 9j, different wear-resistant alloy steels have a certain degree of work hardening ability. The closer to the wear surface, the better the work hardening effect is; the farther away from the wear surface, the worse the work hardening effect; the hardening rate of high manganese steel matrix composite is the largest, and the work hardening is hard After annealing at 1000 ℃, oil quenching at 950 ℃ and tempering at 250 ℃, the hardness of high carbon low alloy steel is the highest The work hardening hardness of high carbon low alloy steel annealed at 1000 ℃ and normalized at 950 ℃ and tempered at 570 ℃ is only inferior to that of annealed at 1000 ℃, oil quenched at 950 ℃ and tempered at 250 ℃. However, the former has better toughness than the latter, and the former has quite high hardness. Therefore, the former is annealed at 1000 ℃ under the condition of impact energy of 9j +The results show that the wear resistance of high carbon low alloy steel normalized at 950 ℃ and tempered at 570 ℃ is the best, which is consistent with the result of corrosion wear quality analysis.
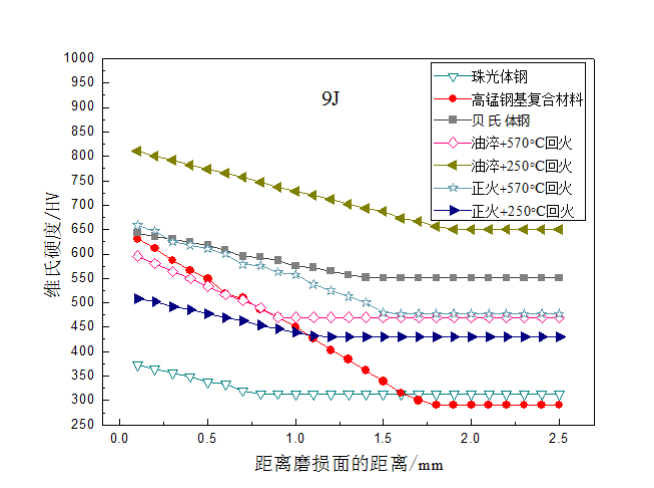
Fig.5-6 The strain hardening curves of different lining alloy steels under 9J impact energy
5.3 The results
The high carbon low alloy wear-resistant steel with a composition of Fe 93.50%, C 0.65%, Si 0.54%, Mn 0.97%, Cr 2.89%, Mo 0.35%, Ni 0.75%, and N 0.10% was treated by four different heat treatments. The impact corrosion abrasive wear tests of heat-treated high carbon low alloy steel, bainite steel liner, high manganese steel matrix composite liner, and pearlite steel liner were carried out:
- In the impact corrosion abrasive wear test under impact energy of 4.5J, the impact corrosion abrasive wear resistance of bainitic steel liner is bainite steel liner > 1000 ℃ annealing + 950 ℃ normalizing + 570 ℃ tempered high carbon low alloy steel > 1000 ℃ annealing + 950 ℃ oil quenching + 250 ℃ Tempered high carbon low alloy steel > pearlite steel liner > 1000 ℃ annealing + 950 ℃ normalizing + 250 ℃ tempered high carbon low alloy steel > 1000 ℃ annealing + 950 ℃ oil quenching + 570 ℃ tempered high carbon low alloy steel > high manganese steel matrix composite lining plate. The results show that the weight loss of alloy steel increases with time, and almost linearly.
- Under the impact energy of 4.5j, part of the samples are mainly micro-cutting wear mechanisms, some samples are mainly fatigued spalling wear mechanisms, and some samples have both wear mechanisms. High carbon low alloy steels annealed at 1000 ℃ and normalized at 950 ℃ and tempered at 570 ℃, high carbon low alloy steels annealed at 1000 ℃ and normalized at 950 ℃ and tempered at 250 ℃, bainite steel liners and high manganese steel matrix composite linings are mainly micro-cutting mechanism, supplemented by fatigue spalling wear mechanism. The fatigue spalling mechanism of high carbon low alloy steel annealed at 1000 ℃, oil quenched at 950 ℃ and tempered at 570 ℃ and annealed at 1000 ℃ + oil quenched at 950 ℃ and tempered at 250 ℃ are mainly fatigue spalling mechanism, supplemented by the micro-cutting mechanism. The mechanism of fatigue spalling and micro-cutting is equally important for pearlite steel liner.
- In the impact corrosion abrasive wear test under 9j impact energy, the impact corrosion abrasive wear resistance is as follows: 1000 ℃ annealing + 950 ℃ normalizing + 570 ℃ tempering high carbon low alloy steel > bainite steel liner plate ≥ 1000 ℃ annealing + 950 ℃ oil quenching + 570 ℃ recovery High carbon low alloy steel annealed at 1000 ℃, oil quenched at 950 ℃ and tempered at 250 ℃ for high carbon low alloy steel ≥ high manganese steel matrix composite liner > 1000 ℃ annealing + 950 ℃ normalizing + 250 ℃ tempering high carbon low alloy steel ≥ pearlite steel liner. The results show that the weight loss of alloy steel increases with time, and almost linearly.
- Under the impact energy of 9j, some samples are mainly micro-cutting wear mechanisms and some samples are fatigue spalling wear mechanisms. High carbon low alloy steels annealed at 1000 ℃ and normalized at 950 ℃ and tempered at 570 ℃, high carbon low alloy steels annealed at 1000 ℃ and normalized at 950 ℃ and tempered at 250 ℃, high carbon low alloy steels annealed at 1000 ℃ and oil quenched at 950 ℃ and tempered at 570 ℃, bainite steel liners and high manganese steel matrix composite linings are mainly micro-cutting mechanism, supplemented by fatigue spalling wear mechanism. The fatigue spalling mechanism of high carbon low alloy steel and pearlite steel lining plate annealed at 1000 ℃ and oil quenched at 950 ℃ and tempered at 250 ℃ is dominated by fatigue spalling mechanism, supplemented by a micro-cutting mechanism.
- Under the impact energy of 4.5J and 9J, the corrosion of all samples is not obvious. Under the test conditions, the corrosion resistance of these samples is good.
6.0 Research of Corrosion-abrasion Resistant Alloy Steel SAG Mill Liners Results
In this paper, the impact corrosion and abrasive wear condition of the mill liners of the semi-autogenous mill are taken as the background, using Lycra metallographic microscope, muffle furnace, hardness tester, and XRD.The effects of heat treatment on microstructure, hardness, impact absorbed energy, tensile test results, and impact corrosion abrasive wear of high carbon low alloy steel were studied by means of a diffractometer, instrumented impact testing machine, tensile testing machine, impact corrosion abrasive wear tester and scanning electron microscope. At the same time, the new bainite alloy steel mill liners, new high manganese steel matrix composite alloy steel mill liners, and pearlite alloy steel mill liners are also studied. The main conclusions are as follows:
- After annealing at 1000 ℃, normalizing at 950 ℃ and tempering at 570 ℃, the microstructure of wear-resistant high carbon low alloy steel with a composition of C 0.65%, Si 0.54%, Mn 0.97%, Cr 2.89%, Mo 0.35%, Ni 0.75%, and N 0.10% is pearlite. The high carbon low alloy steel annealed at 1000 ℃ and normalized at 950 ℃ and tempered at 250 ℃ also has a pearlite structure. However, the pearlite structure of the former tends to be spheroidized and its comprehensive properties are better than the latter. The microstructure of high carbon low alloy steel annealed at 1000 ℃, oil quenched at 950 ℃ and tempered at 570 ℃ is tempered sorbite with martensite orientation. The high carbon low alloy steel annealed at 1000 ℃, oil quenched at 950 ℃ and tempered at 250 ℃ is tempered martensite. The high carbon low alloy steel annealed at 1000 ℃, oil quenched at 950 ℃ and tempered at 250 ℃ has the highest Rockwell hardness (57.5 HRC). The high carbon low alloy steel annealed at 1000 ℃, normalized at 950 ℃ and tempered at 570 ℃ has the highest impact absorption energy (8.37j) and the best toughness. The results of the tensile test show that the strength of high carbon low alloy steel (# 3) annealed at 1000 ℃, oil quenched at 950 ℃ and tempered at 570 ℃ has the best strength (RM: 1269 MPa)The tensile test results also show that the elongation after fracture δ of high carbon low alloy steel (# 1) annealed at 1000 ℃, normalized at 950 ℃ and tempered at 570 ℃ has the maximum elongation after fracture (14.31%), and the fracture is a ductile fracture.
- The results show that the microstructure of bainitic steel liner is black needle-like lower bainite and part of feather-like upper bainite, and the hardness is 51.7 HRC. After the trial application, the hardness of the liner is increased by 50 HV, the depth of work hardening is 10 mm, and the impact energy absorption of V-notch is 7.50 J. High manganese steel matrix composite liner is a composite material with austenite structure as matrix and carbide as the second phase. The hardness of the liner is 26.5 HRC, and the highest hardness of the liner is 667 HV (58.7 HRC), the depth of work hardening is 12 mm, the impact absorbed energy of standard u-notch is 87.70 J, and the impact fracture surface is a ductile fracture. The elongation after fracture is 9.20%, and the tensile fracture is a mixed fracture. The tensile strength and yield strength of the liner are 743 MPa and 547 MPa respectively. The microstructure of the pearlite steel liner is black and white pearlite structure, and the hardness is 31.3 HRC. There is no obvious work hardening phenomenon after trial use. The impact absorbed energy of standard V-notch of pearlite steel liner is 6.00 J, and the fracture surface is a microlocal plastic fracture and macro brittle fracture. The elongation after fracture of pearlite steel liner is 6.70%, and the tensile fracture is a brittle fracture. The tensile strength and yield strength of pearlite steel liner are 766 MPa and 420 MPa.
- At 4.5j In the impact corrosion abrasive wear test under impact energy, the impact corrosion abrasive wear resistance of bainitic steel lining plate > 1000 ℃ annealing + 950 ℃ normalizing + 570 ℃ tempered high carbon low alloy steel > 1000 ℃ annealing + 950 ℃ oil quenching + 250 ℃ tempered high carbon low alloy steel > pearlite steel liner > 1000 ℃ annealing + 950 ℃ normalizing + 250 ℃ tempered high carbon low alloy steel > 1000 ℃ annealing + 950 ℃ oil quenching + 570 High carbon low alloy steel as tempered state > high manganese steel matrix composite lining plate. High carbon low alloy steels annealed at 1000 ℃ and normalized at 950 ℃ and tempered at 570 ℃, high carbon low alloy steels annealed at 1000 ℃ and normalized at 950 ℃ and tempered at 250 ℃, bainite steel liners and high manganese steel matrix composite linings are mainly micro-cutting mechanism, supplemented by fatigue spalling wear mechanism. The fatigue spalling mechanism of high carbon low alloy steel annealed at 1000 ℃, oil quenched at 950 ℃ and tempered at 570 ℃ and annealed at 1000 ℃ + oil quenched at 950 ℃ and tempered at 250 ℃ are mainly fatigue spalling mechanism, supplemented by the micro-cutting mechanism. The fatigue spalling mechanism and micro-cutting mechanism are equally important for the pearlite steel liner.
- In the impact corrosion abrasive wear test under 9j impact energy, the impact corrosion abrasive wear resistance is as follows: 1000 ℃ annealing + 950 ℃ normalizing + 570 ℃ tempering high carbon low alloy steel > bainite steel liner plate ≥ 1000 ℃ annealing + 950 ℃ oil quenching + 570 ℃ recovery High carbon low alloy steel annealed at 1000 ℃, oil quenched at 950 ℃, tempered at 250 ℃, high carbon low alloy steel ≥ high manganese steel matrix composite lining plate > 1000 ℃ annealing + 950 ℃ normalizing + 250 ℃ tempering high carbon low alloy steel ≥ pearlite liner. High carbon low alloy steels annealed at 1000 ℃ and normalized at 950 ℃ and tempered at 570 ℃, high carbon low alloy steels annealed at 1000 ℃ and normalized at 950 ℃ and tempered at 250 ℃, high carbon low alloy steels annealed at 1000 ℃ and oil quenched at 950 ℃ and tempered at 570 ℃, bainite steel liners and high manganese steel matrix composite linings are mainly micro-cutting mechanism, supplemented by fatigue spalling wear mechanism. The fatigue spalling mechanism of high carbon low alloy steel and pearlite steel lining plate annealed at 1000 ℃ and oil quenched at 950 ℃ and tempered at 250 ℃ is dominated by fatigue spalling mechanism, supplemented by a micro-cutting mechanism.
- Under the impact energy of 4.5j and 9j, the corrosion of all samples is not obvious, and the corrosion resistance of all samples is better under the test conditions.

